Hydroponics is the cultivation of plants without traditional soil or soilless mixes — roots are suspended directly in a nutrient solution or air, supported by inert media that provides structure but zero nutrition. For commercial cannabis cultivators, CEA professionals, and serious indoor growers, hydroponics isn’t just a growing method. It’s a precision production system — one that delivers faster crop cycles, heavier yields, and granular control over every variable in the root zone.
Who this guide is for: Commercial cannabis growers, controlled environment agriculture (CEA) professionals, and serious indoor cultivators looking to maximize yields, reduce crop cycles, and gain precision control over plant nutrition.
What problem this solves: Traditional soil growing limits your control over nutrient delivery, extends crop cycles, and caps yield potential. This guide walks you through hydroponic systems — from foundational concepts to system selection and a complete 6-phase commercial crop workflow — so you can make informed decisions about transitioning to or optimizing soilless cultivation.
For more foundational concepts, see our Definitive Guide on Indoor Growing.
What Is Hydroponics?
Hydroponics delivers nutrients directly to plant roots via water — eliminating the soil buffer entirely. In place of soil, roots are supported by inert growing media (rockwool, clay pebbles, coco coir) or suspended in air. The only nutrients your plants receive are what you deliver, precisely, to the root zone.
This direct availability is what drives the faster growth rates and heavier yields that hydroponics is known for. It’s also what makes it unforgiving: there is no soil buffer absorbing and moderating your inputs. pH drift of 0.3 over 24 hours can lock out critical nutrients. An overfeeding event at EC 3.5 in a DWC system can show visible damage within hours.
Key principle: In hydroponics, you control every variable — pH, EC, dissolved oxygen, water temperature, nutrient ratios. That precision is both the advantage and the responsibility.
Why Commercial Growers Choose Hydroponics
Higher Water Efficiency
Recirculating hydroponic systems use up to 90% less water than soil cultivation under comparable conditions. Nutrient solution is reused rather than lost to runoff or evaporation — reducing both water overhead and environmental impact. For operations in water-restricted regions or states with strict environmental compliance, this alone justifies the system investment.
Up to 25% Faster Crop Cycles
Hydroponic plants can grow approximately 25% faster than soil-grown plants under optimized conditions including equivalent lighting, temperature, and nutrient management — attributable to consistent, direct nutrient availability and elevated dissolved oxygen levels at the root zone. For commercial operators, that translates to more crop turns per year, shorter time to first harvest on facility buildouts, and accelerated ROI.
Up to 30% Higher Yields
Under dialed conditions (appropriate system type, correct EC/pH, optimized lighting and VPD), yields can increase by 30% or more compared to soil — compounding the benefit of faster cycles with higher production per square foot per year.
Precision Nutrient Control
No soil buffer means no guessing. You dose precisely what each cultivar needs at each growth stage, adjusting EC and pH in real time based on plant response and drain data. This precision is the foundation of crop steering in rockwool and coco — the practice that’s pushing commercial yields further every year.
The Trade-Offs: What You Need to Know Before Committing
Steeper Learning Curve
Hydroponics demands daily monitoring of pH, EC (ppm), dissolved oxygen, and water temperature. Overfeeding or pH drift can damage crops within hours — a margin for error far narrower than soil. If you’ve never grown before, start with soil or coco coir before moving to full hydroponics.
Higher Initial Investment
Hydroponic systems require infrastructure soil grows do not:
- Reservoirs and pumps
- Air pumps and diffusers
- pH and EC dosing systems
- Water chillers (in facilities with heat load or warm ambient temps)
- Filtration systems (RO or sediment/chlorine filters)
ROI comes from higher yields, faster cycles, and reduced water and labor costs over time — but the upfront capital requirement is real and must be planned for.
Hydroponic Growing Media: What Supports Your Plants
Growing media in hydroponics is inert — it provides no nutrition. Its job is to anchor roots, maintain moisture/aeration balance, and in some cases provide steerability over root-zone water content.
Rockwool
Best for: Commercial propagation, drip systems, and slab grows
Rockwool (stonewool) excels at water retention while maintaining excellent aeration — a combination that makes it the default substrate for large-scale commercial cannabis operations. It’s completely inert, stable throughout the crop cycle, and compatible with automated drip irrigation and crop steering protocols.
VidaWool is Hydrobuilder’s preferred rockwool system. VidaWool’s Hydro-Xtend™ water dispersion technology ensures even moisture distribution throughout the block — eliminating wet/dry zones that cause uneven root development. VidaWool’s three-stage plug → block → slab system allows seamless transplantation between growth phases without disturbing root structure. For operations where consistency and repeatability matter most, VidaWool’s North American supply chain and horticulture expert network provide additional security.
Considerations: Rockwool requires pre-soaking to buffer pH (target 5.5–6.5 at saturation, with 5.8–6.2 being common practice); it is not reusable between cycles.
For a deeper look at rockwool as a substrate, see our rockwool growing guide. For a broader comparison of grow media options, see our Definitive Guide to Traditional and Hydroponic Grow Media.
Clay Pebbles (Hydroton / LECA)
Best for: Ebb and flow, DWC, drip systems
Clay pebbles are pH neutral, 100% inert, reusable, and provide excellent drainage — making them ideal for flood-and-drain systems where the drain cycle itself oxygenates roots. Mother Earth Hydroton is the original expanded clay brand and remains the commercial standard.
Considerations: Requires thorough rinsing before use; can dry out quickly in top-fed systems without frequent irrigation intervals.
Coco Coir
Best for: Hand-watered hydro, drain-to-waste systems, hybrid approaches
Coco provides organic, renewable growing media with excellent moisture-to-air balance. Technically classified as soilless rather than pure hydroponics, coco requires coco-specific nutrients (it binds calcium and magnesium differently than inert media). Its buffering capacity and slower response to EC changes makes it more forgiving for operators transitioning from soil.
For a full deep dive, see our Complete Guide to Growing in Coco Coir.
The 5 Most Common Hydroponic Systems (And Which to Choose)
Hydroponic systems fall into two categories: passive (water moves via capillary action) and active (water is pumped — the standard for virtually all commercial operations). Here are the five systems used by commercial growers.
1. Deep Water Culture (DWC)
How it works: Roots are suspended in an aerated nutrient solution. An air pump and diffuser create dissolved oxygen in the reservoir, preventing root suffocation.
Best for: Small to mid-scale operations; growers prioritizing simplicity and low maintenance.
Advantages: Few moving parts, direct nutrient uptake, low maintenance overhead.
Challenges: No soil buffer — overfeeding risk is elevated. Requires constant aeration. Water temperature must stay between 65–70°F; anything above 72°F drops dissolved oxygen and triggers root rot risk (Pythium, Fusarium).
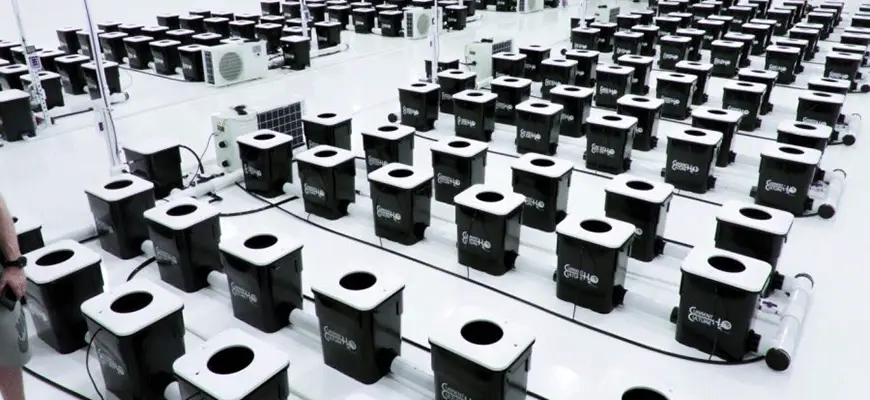
Commercial application: Many larger operators run Recirculating DWC (RDWC) — multiple connected sites sharing a central reservoir and oxygenation system — for mid-to-large scale cannabis production. The Current Culture Under Current UCXL13 RDWC System represents the professional-grade RDWC format: closed-loop recirculation, passive under-current technology, and true commercial scalability.
Sizing guideline: Use at least 1 watt of air pump per gallon of reservoir capacity for DWC and RDWC systems.
2. Top Drip Systems
How it works: Drip emitters deliver nutrient solution to the top of the growing medium at timed intervals. Excess drains back to the reservoir (recirculating) or to waste (drain-to-waste).
Best for: Large commercial grows; operators using rockwool slabs or coco; facilities integrating automated fertigation.
Advantages: Infinitely scalable. Precise control over feeding frequency, volume, and timing. Fully compatible with automated fertigation controllers and crop steering protocols. The most common system type in large-scale commercial cannabis cultivation.
Challenges: Drip lines clog without proper filtration and regular line cleaning. Requires routine emitter inspection and system maintenance.
One of the most widely deployed tray systems for commercial top drip is the Botanicare Slide Bench System — a modular benching platform that eliminates fixed aisles, maximizes canopy coverage, and scales from 500 to 60,000+ square feet of canopy.
3. Aeroponics
How it works: Roots are suspended in air. Misters spray nutrient solution directly onto the root zone at timed intervals — maximum oxygen exposure, maximum growth rate.
Best for: Advanced growers; propagation and cloning; operators who want the fastest possible rooting.
Advantages: Maximum oxygen exposure drives the fastest growth of any system. Highly efficient nutrient delivery. The industry standard for commercial cloning operations.
Challenges: Requires precise timing and misting intervals. System failure (pump malfunction) can kill plants within hours. Higher complexity and infrastructure cost.
Commercial application: Many commercial cultivators use aeroponics for their propagation and cloning stage, then transplant rooted clones into DWC or drip systems for vegetative growth and flower.
4. Ebb and Flow (Flood and Drain)
How it works: Growing trays are flooded with nutrient solution on a timer, then drained back into the reservoir. Roots receive nutrients during the flood cycle and oxygen exposure during drain.
Best for: Mid-size commercial operations; operators using clay pebbles or rockwool.
Advantages: Combines oxygenation (like aeroponics) with sustained nutrient availability (like DWC). Less prone to overfeeding than DWC. Flexible feeding schedules.
Challenges: Requires precise timer configuration; pump failure leads to dry roots and potential crop loss.
5. Vertical Hydroponic Towers
How it works: Plants grow in vertically stacked layers, fed by a recirculating pump from base to top.
Best for: Space-limited operations; leafy greens, herbs, microgreens; high-turnover crops.
Advantages: Maximizes vertical space utilization, small footprint per plant, excellent for high-density, fast-turnover crops.
Challenges: Not appropriate for large flowering plants (cannabis, tomatoes). Limited root volume per site restricts plant size and yield potential.
Which Hydroponic System Is Best?
For most commercial cannabis cultivators, Top Drip or RDWC systems offer the best balance of control, scalability, and yield potential. Top drip integrates most cleanly with automated fertigation and crop steering protocols at scale; RDWC delivers exceptional performance in mid-size operations prioritizing root zone conditions and dissolved oxygen.
For a deep dive on specific system picks, read our Best Hydroponic Systems guide. For a complete breakdown of system types, see our guide on the 6 different types of hydroponic systems.
Essential Components for Every Hydroponic System
Air Pumps and Diffusers
Roots submerged in water suffocate without dissolved oxygen. Air pumps and diffusers create micro-bubbles that oxygenate the nutrient solution — the difference between explosive root growth and root rot.
Sizing guideline: Minimum 1 watt of air pump per gallon of reservoir capacity for DWC and RDWC systems. Scale up in warm environments where dissolved oxygen naturally drops.
Water Filtration: RO vs. Sediment/Chlorine Filters
Tap water contains chlorine, chloramines, heavy metals, and dissolved solids that interfere with nutrient uptake and skew your baseline EC. Filtration gives you a 0 ppm starting point — essential for building a precise, repeatable nutrient profile.
Reverse Osmosis (RO): Removes 95–99% of dissolved contaminants. The standard for commercial operations where water quality varies, EC is high, or precise nutrient ratios are critical.
The Hydro Logic Evolution-RO 1200 GPD is the top-performing RO system for serious commercial operations — producing 1,200 gallons of purified water per day at high efficiency. For large-scale grows exceeding standard RO capacity, see our HyperLogic commercial RO guide covering systems up to 19,000 GPD.
Sediment + Chlorine Filters: Removes particulates and chlorine/chloramines. Appropriate for operations with relatively clean municipal water (under 150 ppm starting TDS). Less expensive upfront; insufficient for high-EC feed water.
For a complete comparison, read The Best RO Systems guide.
Water Chillers and Heaters: Temperature Control Is Non-Negotiable
Target range: 65–70°F (18–21°C)
Above 72°F, dissolved oxygen drops sharply and roots become vulnerable to Pythium and Fusarium. Below 60°F, nutrient uptake slows and plants experience cold stress. In most indoor commercial operations, chillers are the concern — not heaters.
The Active Aqua Water Chiller with Power Boost 1/4 HP is the most widely used commercial reservoir chiller at Hydrobuilder — reliable microcomputer temperature control, pure titanium evaporator, and R134a refrigerant for environmentally responsible operation. Select HP rating based on reservoir volume and ambient heat load.
pH and EC Meters: Non-Negotiable Monitoring Tools
pH: Hydroponics requires a stable pH of 5.5–6.0 for optimal nutrient availability across the full mineral spectrum. Outside this window, specific nutrients become unavailable even at adequate concentration — causing deficiency symptoms that look like underfeeding but are actually lockout.
EC (Electrical Conductivity): Measures total dissolved solids in your nutrient solution. Tells you how concentrated your feed is at any moment — and when drift or plant uptake has thrown your ratios off.
The Hanna Instruments GroLine HI9814 is a waterproof, field-grade pH/EC/TDS combo meter purpose-built for hydroponic environments — simultaneous pH and EC readings in a single unit, eliminating the need for two separate instruments.
Best practices:
- Check pH and EC at minimum once daily; twice daily in late flower or when EC is elevated
- Use automated dosing systems (Dosatron, Netafim) for large-scale operations
- Calibrate meters weekly
For meter selection guidance across all operation sizes, read The Best pH Meters guide.
Hydroponic Nutrients: What You Need to Know
Why Hydro-Specific Nutrients?
Standard soil nutrients contain organic particulates and buffers that clog drip lines, pumps, emitters, and air stones. Hydroponic nutrients are formulated to remain fully soluble and stable in water — no settling, no clogging, no biofilm promotion from thick organics.
Avoid Thick, Organic Nutrients in Hydro Systems
Compost teas, fish emulsions, and other heavy organic inputs cause biofilm buildup and clog systems. In recirculating hydroponics especially, stick with mineral-based or chelated nutrients designed for soilless cultivation.
HGV Nutrients: The Commercial Standard
For commercial operations, HGV Nutrients is the system Hydrobuilder recommends first. HGV’s three-part formulation — HGV Dry – Grow, HGV Dry – Flower, and HGV Dry – Base — is the foundation of a proven commercial nutrient program.
Why HGV for commercial grows: HGV Dry is a high-purity, water-soluble concentrate formulated for large-scale mixing. It offers the lowest cost-per-feed of any comparable professional nutrient system — because you’re buying precisely what the plant needs, not water. HGV Flower (0-10-26) delivers elevated phosphorus, potassium, and sulfur precisely calibrated for the generative phase, supporting floral structure development and terpene synthesis. HGV Base (14.5-0-0) provides the calcium and nitrogen foundation both Grow and Flower require — it is the constant in the system, used throughout the entire cycle. HGV Grow (3-6-22) drives vegetative vigor, uniform canopy development, and the root architecture that sets up flowering performance.
HGV Nutrients perform in every media type — rockwool, coco, clay pebbles, DWC, drip. If you want help dialing in your feed program for your specific system and cultivar, Hydrobuilder’s commercial team is available.
Other proven nutrient systems for commercial hydroponic grows: Athena, Cultured Solutions, General Hydroponics, and Botanicare.
pH Management: Keeping Your Reservoir Dialed
pH stability in a recirculating system is an active management job, not a set-it-and-forget-it parameter. As plants uptake nutrients selectively, the ionic balance of your reservoir shifts — pulling pH with it.
HGV Condition – pH Down and HGV Condition – pH Up are engineered specifically for compatibility with HGV nutrients and all major nutrient lines. HGV Condition pH Down uses phosphoric acid and requires no dilution before use. HGV Condition pH Up (17% KOH) raises pH rapidly — dilute before adding to avoid localized pH spikes.
System Maintenance: Preventing Salt Buildup and Biofilm
The Problem
Nutrient salts accumulate in reservoirs, lines, emitters, and air stones with every feeding cycle. Biofilm — bacterial colonies that colonize wet surfaces — clogs lines and harbors plant pathogens. Left unaddressed, salt and biofilm are the leading causes of system underperformance, disease outbreaks, and equipment failure.
The Solution
For commercial operations: HGV Condition – Clear is Hydrobuilder’s recommended system cleaner — a water conditioner that maintains line cleanliness and prevents salt scale buildup when added to each reservoir cycle. For end-of-cycle deep cleaning and aggressive pathogen control, add Current Culture Clear Line 5x — a commercial-strength hypochlorous acid that eliminates biofilm, pathogens, and mineral scale without affecting nutrient balance or pH.
For hobby or small-scale grows: UC Roots (by Current Culture) added at 1–2 ml per gallon with every nutrient change is effective liquid crop insurance for DWC systems.
Maintenance Schedule
- Weekly: Inspect emitters, air stones, and lines for visible salt deposits or reduced flow
- Bi-weekly: Full reservoir drain and fresh nutrient solution
- Each cycle end: Complete system disassembly — scrub reservoirs, flush all lines with HGV Clear or Clear Line 5x, sanitize grow trays and net pots
For a step-by-step breakdown, see our Guide on How to Clean Salt Buildup in Hydroponic Systems.
How Often to Change Reservoir Water
Standard guideline: Every 2–3 weeks for recirculating systems.
Change sooner if you observe any of the following:
- EC drift (nutrient ratios become imbalanced as plants selectively uptake specific elements)
- pH instability (swings greater than 0.3 within a 24-hour period)
- Visible algae or biofilm
- Water temperature consistently above 72°F
Pro tip: Between full reservoir changes, top off with fresh RO water plus a proportional nutrient addition — always confirm with an EC meter to maintain consistent EC without letting the reservoir drop in volume and concentrate.
For large-scale operations managing multiple rooms, a Dosatron D14MZ2 fertigation injector automates nutrient delivery through your water line — eliminating manual mixing, ensuring batch-to-batch consistency, and removing a major source of human error from your operation.
How to Run a Commercial Hydroponic Crop: Step-by-Step Workflow
This 6-phase workflow represents the standard commercial hydroponic cannabis crop cycle from propagation to system reset. All environmental parameters should be adjusted for your specific cultivar and facility conditions.
Phase 1: Propagation (Days 1–14)
Goal: Root establishment from clones or seedlings
- System: Aeroponic cloning machines or rockwool plugs in humidity domes
- EC: 0.4–0.8 (light feeding; primary focus is rooting, not vegetative growth)
- pH: 5.5–6.0
- Environment: 72–80°F, 70–80% RH, 18/6 light cycle
Key actions: Apply rooting hormone. Maintain high humidity. Mist clones 2–3x daily if not using an aeroponic cloner. Maintain tight, consistent temperature in the propagation zone.
Substrate note: VidaWool plugs — with predrilled (not slit) insertion holes and Hydro-Xtend moisture distribution — are designed for reliable, repeatable clone rooting with seamless transition to the block at transplant.
Phase 2: Vegetative Growth (Weeks 2–6+)
Goal: Build plant structure, root mass, and canopy framework for flowering
- System: Transplant rooted clones to DWC, top drip, or ebb/flow
- EC: 1.2–1.8 (ramp gradually; do not spike)
- pH: 5.5–6.0
- Environment: 68–78°F, 40–60% RH, 18/6 light cycle
Key actions: Top or train plants for canopy uniformity. Monitor reservoir daily. Begin IPM protocols immediately after transplant — do not wait for pest pressure to appear.
Nutrients: Switch to HGV Dry – Grow + HGV Dry – Base. Ramp EC incrementally as plants establish.
Phase 3: Transition / Flip (Week 1 of Flower)
Goal: Trigger flowering response
- Light cycle: Switch to 12/12
- EC: Maintain 1.4–1.8; begin introducing bloom-specific nutrients
- Key actions: Monitor stretch (plants can double or more in height during transition). Adjust trellis and canopy management. Complete any final defoliation before canopy closes.
Nutrients: Begin transitioning to HGV Dry – Flower + HGV Dry – Base. Reduce HGV Grow proportionally over the first week.
Phase 4: Flowering (Weeks 2–8+)
Goal: Maximize flower production and secondary metabolite expression
- EC: 1.6–2.4 (cultivar dependent — monitor drain EC as your primary guide)
- pH: 5.5–6.0
- Environment: 68–76°F, 40–50% RH
Key actions: Defoliate strategically to maintain airflow. Monitor for pests and powdery mildew — RH above 50% in late flower is a risk factor. Begin reducing nitrogen mid-flower; increase P/K support with HGV Flower.
HGV Flower note: HGV’s 0-10-26 formula with elevated sulfur directly supports terpene synthesis and secondary metabolite production during the generative phase — the nutritional profile that matters most for premium cannabis expression.
Phase 5: Flush and Harvest (Final 7–14 Days)
Goal: Remove residual salt accumulation; improve final product quality and flavor
- EC: 0.0–0.2 (RO water only, or light flush solution)
- Duration: 7–14 days depending on system, media, and cultivar
Key actions: Monitor trichome maturity daily. Harvest when 10–20% of trichomes show amber coloration (adjust based on cultivar profile and buyer preference). Drain-to-waste systems may use a shorter flush of 5–7 days; consult your testing lab for residual salt guidance. Recirculating systems benefit from the full window.
Phase 6: Post-Harvest System Reset
- Drain and discard all nutrient solution
- Disassemble and deep clean all reservoirs, lines, emitters, and air stones
- Circulate HGV Clear or Clear Line 5x through all lines — hold for recommended contact time, flush with RO water
- Sanitize grow trays, net pots, and all surfaces that contacted plant material
- Inspect and replace worn emitters, line connections, and air stones before the next cycle
For a complete cleaning protocol, see our Guide on How to Clean Salt Buildup in Your Hydroponics System.
Building a DIY Hydroponic System (Bucket DWC)
For operations piloting hydroponics before scaling, or growers benchmarking hydro against their current method, a single-plant bucket DWC is the fastest proof-of-concept setup available. Materials needed: 5-gallon bucket with lid, 5–8 watt air pump, air stone or diffuser, 6″ net pot, growing medium (clay pebbles or rockwool).
Instructions:
- Cut a hole in the bucket lid sized for the net pot
- Place the net pot into the hole
- Fill the bucket so the water line just touches the bottom of the net pot (roots will grow down into the solution as they develop)
- Place the air stone at the bottom of the bucket; run tubing to the air pump outside the bucket
- Anchor your plant in the net pot using growing medium
- Monitor pH (5.5–6.0) and EC: start at 0.8–1.2 for seedlings, ramp to 1.4–2.0 in veg, 1.6–2.4 in flower
Maintenance: Top off with fresh water every 2–3 days. Replace nutrient solution every 10–14 days. Clean reservoir and air stone monthly.
Everything You Need at HydroBuilder.com
HydroBuilder is the largest and most respected hydroponics store in the United States, carrying the full spectrum of commercial hydroponic equipment from the industry’s leading brands: Netafim, Botanicare, Dosatron, Active Aqua, FloraFlex, Current Culture, Athena, General Hydroponics, VidaWool, HGV Nutrients, and more.
From complete RDWC and drip systems to every DIY component for custom Ebb & Flow, bucket DWC, or top drip builds — we carry every part you need and the commercial expertise to help you optimize your operation.
Why Shop at HydroBuilder?
- 100% Secure Shopping — every transaction protected
- Largest Selection — the deepest commercial hydroponic inventory online, including HGV Nutrients available exclusively through Hydrobuilder
- Commercial Accounts — dedicated pricing and support for licensed cultivators and CEA operations;
- request a commercial account here
- Expert Support — call 888-815-9763 or use Grow Diagnostics for technical guidance from our team of experienced growers
Frequently Asked Questions