Mixing plant nutrients in the correct order is one of the most overlooked—yet most impactful—steps in feeding your plants. Get it wrong, and certain nutrients can fall out of solution as precipitate before your roots ever get the chance to absorb them; get it right, and your plants receive a balanced, fully available feed every single time with far fewer surprises in EC, pH, or plant response. This guide covers the proper sequence for mixing plant nutrients, how long to wait between steps, water source best practices, and how to verify your solution is dialed in with EC/PPM and pH so you can scale from a small tent to large reservoirs confidently.
Whether you’re growing in soil, coco, or a hydroponic system, the fundamentals apply—so keep reading regardless of your setup.
Bridge: From home hobbyists running a small tent to commercial growers managing large reservoirs, mixing sequence affects everyone equally. The underlying chemistry does not change with scale—so the guidelines below serve growers at every level, with added notes where commercial operations need more documentation and process control.
Why Mixing Order Matters
The correct nutrient mixing order prevents a specific problem: salt precipitation. When certain nutrients contact each other at high concentration before being diluted, they can react chemically and “fall out” of solution—meaning your plants cannot absorb those elements even though you added them. A common example is silica (which is strongly alkaline in concentrate) reacting with calcium or phosphate-containing nutrients before adequate dilution has occurred, forming insoluble compounds. Mixing in the correct order—always adding to water and never combining concentrates directly—helps prevent precipitation, stabilizes EC/PPM readings, and protects your plants from inconsistent, incomplete nutrition and clogged lines in fertigation systems.
Before you add anything, consider your water. Most tap water contains chlorine, chloramine, and dissolved solids that push your baseline PPM up before you’ve added a single nutrient, and some sources also carry bicarbonates that influence pH stability. The higher your starting PPM, the less room you have to work with your feeding schedule, and the harder it becomes to dial in EC accurately and predictably.
A quality reverse osmosis (RO) system gives you a near-zero PPM starting point—a blank canvas where you control exactly what goes in. The Hydro Logic Evolution-RO High Flow RO System handles up to 1,200 GPD and is designed for serious hobby to mid-scale operations that need consistent low-mineral water. At minimum, a sediment and dechlorinator filter will remove the most damaging tap water contaminants; for a complete breakdown of options, see our best RO system guide.
Note for coco and RO water growers: RO filtration strips out naturally occurring calcium and magnesium. Coco coir also naturally sequesters calcium due to its cation exchange properties, meaning it tends to hold on to calcium and release potassium. In these situations, calcium and magnesium supplementation becomes functionally required in most programs, often at every feed, so plan for this before you mix and confirm rates against your nutrient manufacturer’s recommendations and water analysis.
The Correct Nutrient Mixing Order: Step by Step
Here is the universal mixing sequence, beginning to end. Always start with your full volume of plain water in the reservoir or mixing container before adding anything so each product is diluted quickly and evenly.
Step 1 — Silica (First, Always)
Add silica to plain water first and generally let it mix and sit for at least 10–15 minutes before adding anything else, with up to 30 minutes as a conservative buffer if time allows.
Silica is typically the most alkaline component of any nutrient feed, especially potassium silicate products, and it needs to be diluted and dispersed in water before other nutrients are introduced. If you add silica at the same time as phosphate-containing base nutrients, or directly into a concentrated mix, a precipitation reaction can occur—meaning a portion of both silica and phosphorus becomes unavailable to your plants and may leave residue in tanks and lines. Botanicare Silica Blast is a widely used liquid silica for hobby to mid-scale growers, delivering potassium silicate in an easy-pour form for any system or medium—use 2–5 mL per gallon of plain water as directed on the label, stir well, and allow adequate mixing time before proceeding. For large commercial operations, Certis Biologicals AgSil 16H Potassium Silicate is the same food-grade potassium silicate compound in a 50 lb dry bulk format, dissolving cleanly when pre-dissolved and costing significantly less per gram of silica than most liquid products at equivalent rates. At recommended use rates around 1.5 g/gal (or as specified by your agronomist), a 50 lb bag covers thousands of gallons—making it a strong fit for facilities mixing large reservoirs daily.
Beyond mixing order compliance, silica supplementation is widely used to promote stronger stems, improve plant rigidity under heavy flowers, and support plants under heat and high-light stress by improving tissue strength and water-use efficiency when the rest of the nutrient program and environment are optimized. Research across multiple crops also links silicon nutrition to improved tolerance to certain abiotic and biotic stresses, so many controlled-environment growers keep it in the tank from early veg through late flower.
Step 2 — Base Nutrients (A/B or Multi-Part)
After your silica has fully mixed into solution (minimum 10–15 minutes of circulation in most setups), add your base nutrients.
Base nutrients supply the NPK and secondary mineral foundation that every other supplement builds on. If you’re using a two-part or three-part system with separate A and B bottles, check your product’s label—most manufacturers specify which part goes first and whether they must be added separately. As a general rule, add whichever part contains the bulk of the calcium first and the high-phosphate component last between the two, because phosphate can react with calcium at high concentration; in most two-part systems this means adding the “A” nitrogen/calcium part first, then the phosphate/potassium “B” part after thorough mixing and dilution.
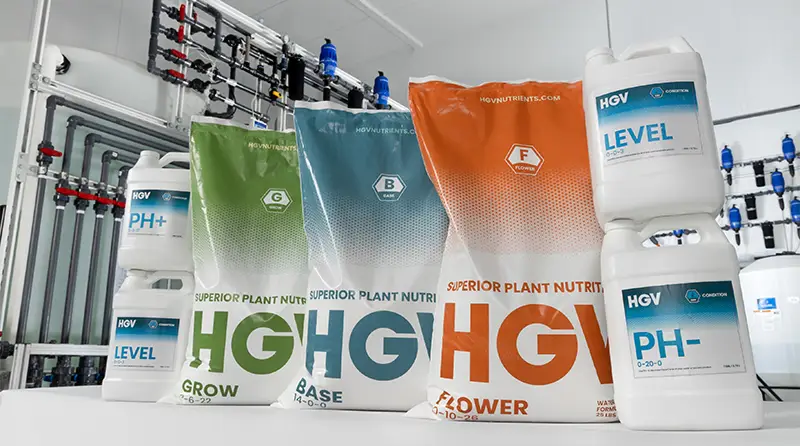
HGV Dry Nutrients offer an industry-focused departure from juggling multiple unrelated products: the HGV system is formulated so that Base, Grow, and Flower can be added sequentially without typical interaction concerns when mixed as directed. Designed and used by HydroBuilder’s own grow team for decades across rockwool, coco, DWC, ebb-and-flow, and NFT, the HGV line is built for growers who want maximum performance with minimum guesswork in automated and hand-mix systems.
For veg cycles, HGV Dry — Grow (3-6-22 NPK) is formulated to drive structural growth and root development. For bloom, HGV Dry — Flower (0-10-26 NPK) delivers the elevated phosphorus and potassium that flowering plants demand, particularly under high-intensity lighting. Both use HGV Dry — Base (14.5-0-0) as the nitrogen and micro-mineral backbone throughout the entire crop cycle, simplifying ordering and feeding decisions for multi-room facilities.
The HGV dry format reduces many of the ionic instability and pH-drift issues introduced by combining multiple liquid concentrates from different manufacturers—an especially important consideration for growers running recirculating systems where pH stability and emitter cleanliness matter over multiple days. HGV nutrients can often be run at a relatively consistent target strength from start to finish in programs designed that way, but commercial growers should still adjust EC based on cultivar response, crop steering targets, and runoff/return EC data rather than locking in a single value blindly.
Stir or circulate your solution thoroughly after adding base nutrients—using a pump or mechanical mixer in larger tanks—and verify your EC/PPM before moving on to the next step. Use a quality meter such as the Bluelab Conductivity Pen to confirm you’re within your target range for the current growth stage and medium.
Step 3 — Cal-Mag (If Using)
After base nutrients are fully mixed and circulated, add your cal-mag supplement.
Calcium and magnesium supplementation is not optional in many RO water or coco coir programs—it is effectively required in most of these setups to maintain adequate Ca/Mg availability, although exact dosing still depends on water analysis and base nutrient formulation. RO filtration removes these naturally occurring minerals along with everything else, and coco coir has a well-documented cation exchange capacity that preferentially holds calcium and magnesium, releasing them more slowly than plants may demand during peak growth. Without appropriately tuned supplementation in these scenarios, you are very likely to see calcium and magnesium deficiency symptoms (such as interveinal chlorosis and tip burn) even if your base nutrient technically contains some. Botanicare Cal Mag Plus is one of the most widely used supplemental calcium-magnesium-iron products in indoor cultivation, supplying Ca/Mg/Fe plus additional trace minerals, amino acids, and botanical inputs that support uptake efficiency. Typical rates are 2–5 mL/gal in hydro systems, with the higher end commonly used for coco or heavily fruiting crops, but always follow the product label and adjust based on your water report and plant response.
Step 4 — Remaining Supplements and Additives
With silica, base nutrients, and cal-mag in solution, add remaining supplements: root stimulants, bloom boosters, humic/fulvic acids, carbohydrates, biologicals, and other additives.
Supplements like BioAg Ful-Power, Impello Biosciences Tribus or similar inoculants, microbial products, and bloom enhancers should always go in after the mineral foundation is established at working strength. This order matters because some organic and biological additives can interact with concentrated mineral salts if they’re combined before dilution, which may reduce effectiveness or contribute to biofilm. Adding them last—with the bulk of your water and mineral nutrition already in solution—minimizes interaction risk and helps keep lines cleaner in fertigation systems.
Check your nutrient manufacturer’s feeding schedule for specific sequence guidance within this step, as some additives have compatibility notes (for example, not mixing certain oxidizing products with live microbial inoculants in the same tank).
Step 5 — pH Adjustment (Always Last)
pH is always the final step—never pH your water before adding nutrients.
Many growers make the mistake of trying to set pH before mixing in nutrients. This is incorrect because almost every additive you pour into your reservoir shifts pH, sometimes significantly. If you pH first, you’ll shift it again with every subsequent addition and waste pH adjuster while chasing a moving target; instead, set pH last, after all products are fully mixed and your EC/PPM reading is confirmed.
Target ranges (under typical grow room conditions of 68–77°F and assuming adequate oxygen and drainage):
- Hydroponics: 5.5–6.5, ideally 5.8–6.2 for most high-value crops
- Coco: 5.8–6.2 to balance the availability of Ca, Mg, and micronutrients
- Soil: 6.0–7.0, ideally 6.2–6.8, depending on crop and media buffering
HGV Condition — pH Down and HGV Condition — pH Up are professional-grade pH adjusters formulated specifically for use with nutrient solutions. Add in small increments—pH can move faster than you expect, especially in warm, low-alkalinity water—then recheck with a calibrated Bluelab pH Pen. For a detailed walkthrough, see our guide on how to measure and adjust pH for gardening.
Monitoring Your Nutrient Solution
Confirming your solution is ready isn’t guesswork—it requires meters and a basic logging habit. Check EC/PPM after base nutrients and again after all supplements are in so you know where each component moves the solution, then check pH last once the tank has mixed thoroughly. Re-check pH after 15–30 minutes if your solution is still equilibrating or if you are using large reservoirs with circulation pumps.
The Grow1 Temperature & Humidity Hygrometer won’t measure nutrients directly, but monitoring ambient temperature and humidity is directly relevant here: nutrient solution temperature tends to rise with ambient temps, altering dissolved oxygen, pH drift, and root pathogen pressure in recirculating systems. For most indoor hydroponic systems, keeping reservoir temps typically between 65–70°F—with 65–68°F ideal—offers a strong balance between oxygen solubility and root health.
For accurate, reliable measurements, learn how to calibrate your pH pen so your readings are trustworthy every time, and standardize on EC (rather than PPM conversion scales) wherever possible in commercial operations.
Mixing Equipment That Matters
Precision in nutrient mixing starts with accurate measurement. The HBX Measuring Cup — 2000 mL is designed for exact liquid measurements, with graduated markings that are genuinely readable under grow room lighting and from common working angles. Measuring imprecisely—especially with concentrated liquid nutrients where 1 mL/gal errors compound quickly over large reservoir volumes—is one of the most common causes of EC variation between batches and inconsistent crop steering.
Why Shop at HydroBuilder for Nutrients
HydroBuilder isn’t just a retailer—we’re growers and system designers first. The HGV nutrient line was developed in-house and tested by our team across major growing media and system types for nearly three decades, including high-intensity LED and mixed-light environments. When you ask us a question about nutrients, you’re getting an answer from someone who has fed plants with these products and seen them in commercial rooms, not a call center reading from a generic script.
We offer competitive pricing, expert technical support, and fast shipping. If you’re unsure whether HGV is right for your grow or need help dialing in a feeding program for your specific crop and system, contact our grow room support team and talk to a grower directly.
For Commercial Operations: Scaling Up Your Nutrient Program
Commercial cultivators mixing hundreds or thousands of gallons per day face the same chemical principles—but with far less tolerance for error. A precipitation event in a 500-gallon reservoir wastes more than nutrients; it wastes hours of labor, crop uniformity, and, in fertigation systems, can clog emitters and valves across multiple zones.
Commercial Workflow: Reservoir Mixing at Scale
- Verify water quality first. Confirm your RO system is producing target PPM (commonly <30 ppm for most high-value crops) and stable output temperature. Log this daily so trends are obvious. The Hydro Logic Evolution-RO High Flow delivers up to 1,200 GPD with commercial-grade filtration suitable for multi-room facilities.
- Mix in sequence at volume. Operate circulation pumps during mixing to ensure uniform dilution at each step, especially in long, narrow tanks. With silica, wait the full 10–15 minutes (up to 30 minutes in larger tanks) before proceeding regardless of how tight the schedule is to minimize precipitation risk.
- Use a Dosatron or inline injection system for consistency. Manual mixing errors accumulate over large volumes and across shifts. Commercial operations benefit from automated dosing to maintain EC and pH batch-to-batch consistency and to reduce labor.
- Verify EC/PPM with a calibrated meter after each step. Batch-to-batch EC variance of more than about 0.2 EC at the same recipe should be investigated for scale errors, water-quality changes, or settling.
- Log every mix. Record date, water source PPM, silica product and batch, base nutrient lot, additives, final EC, final pH, and reservoir temperature. This documentation is one of the most useful tools for diagnosing crop steering variance, emitter fouling, and room-to-room performance differences.
- Use HGV Dry nutrients in 25 lb bulk format. The HGV Dry line was built for exactly this environment—consistent batch-to-batch performance and simplified inventory, without the handling complexity of large volumes of multiple third-party liquid concentrates. Available in the HGV Nutrient Collection
Frequently Asked Questions