

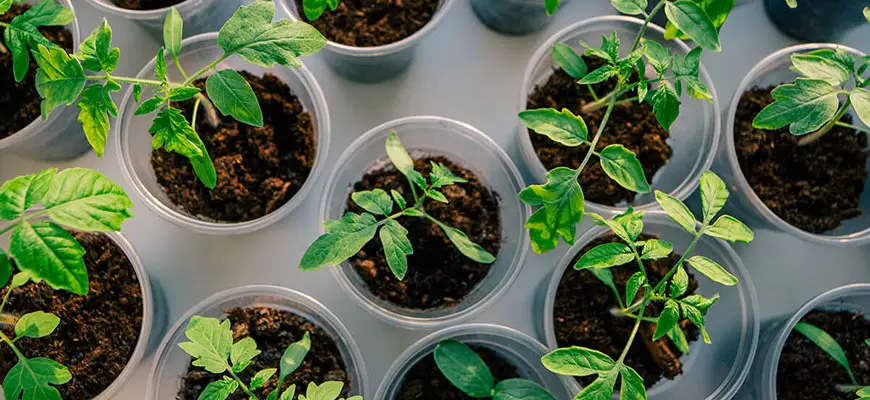
Cloning is one of the most powerful skills in controlled-environment growing. When you know how to clone a plant correctly, you can lock in exceptional genetics forever, cut weeks off your production cycle, and build a perpetually replenishing crop — without ever buying another seed.
This guide covers the complete process: selecting your mother plant, taking cuttings, choosing the right rooting media, and dialing in your propagation environment for consistent results across every method — from starter plugs in a humidity dome to aeroponic cloning machines running dozens of sites.
Whether you’re popping your first cuts in a 4×4 tent or running a dedicated mother plant room, the principles are the same. The tools scale.
Commercial growers: See the For Commercial Operations section for propagation room design, throughput planning, and workflow standardization.
Can Any Plant Be Cloned?
Nearly any plant capable of producing adventitious roots can be cloned — which covers most vegetables, herbs, and flowering crops grown in controlled environments. Cannabis, tomatoes, basil, peppers, cucumbers, and most common hydroponic crops all clone readily from stem cuttings.
Some monocots (corn, onions, grasses with a single central stalk) are poor cloning candidates since they lack the branching structure that makes cuttings viable. For everything else — including most fruiting plants and annuals — cloning via stem cutting is the standard approach.
We have a dedicated guide on how to clone a tomato plant if you’re propagating vegetable crops specifically.
How to Select a Mother Plant
The quality of your clone can never exceed the quality of its mother. Every trait — growth rate, structure, yield potential, terpene profile, disease susceptibility — is baked into the cutting at the moment it’s taken.
Select your mother plant based on these criteria:
What you're looking for:
- Vigorous, uniform growth with no signs of nutrient deficiency, pest damage, or disease
- Strong internode structure — not too leggy, not too compact
- Demonstrated performance in previous cycles (if you’ve run the strain before)
- Confirmed female (for cannabis) — never take clones from an unconfirmed or hermaphroditic plant
- Pest- and pathogen-free — especially critical for viral pathogens like Hop Latent Viroid (HLVd), which transfer directly through cloning tools
When is she ready to take cuttings from?
Take cuttings during mid-to-late vegetative growth — typically 4–8 weeks into veg, when the plant has developed alternating branching and visible shoots with at least 5–6 nodes each. Plants that are too young (under 3–4 weeks) haven’t fully developed the auxin signaling needed for efficient rooting, and clones from immature mothers can take significantly longer to root — or fail entirely.
Pre-cutting preparation:
Withhold nutrients for 2–3 days before taking cuttings. This brief pre-flush lowers nitrogen levels in the plant tissue. Excess nitrogen in fresh cuttings encourages the plant to continue vegetative development rather than redirecting energy toward root initiation. Lower nitrogen = faster rooting.
Read our guide on flushing plants for more context on the why behind this step.
Do not stress the mother plant in the days leading up to cloning. Avoid training, lighting schedule changes, or environmental swings — any stress during this window can reduce clone success rates.
Setting Up Your Cloning Environment
Clones need different conditions than mature plants — higher humidity, moderate warmth, and gentle lighting. Since cuttings have no root system yet, they must absorb moisture entirely through their foliage until roots form.
Target environment during propagation:
- Temperature: 72–78°F (air), 70–75°F (root zone / grow medium)
- Relative humidity: 75–85%
- VPD: 0.4–0.8 kPa (low VPD = lower transpiration demand = less stress on rootless cuttings)
- Lighting: 18 hours on, 6 hours off — low intensity (50–150 µmol/m²/s)
- Air circulation: gentle only — avoid direct airflow onto cuttings
High humidity is non-negotiable during the first week. Without a root system, a cutting’s only moisture source is foliar absorption. Drop humidity below 60% too early and you’ll see wilting, necrosis at leaf edges, and failed cuts.
See our VPD guide for a deeper breakdown of why low VPD is critical during propagation.
Equipment for the propagation environment:
- Humidity dome: Creates the high-RH microclimate cuts need. The HBX 7″ Vented Propagation Dome is a solid fit for standard 10×20 trays — the vents let you dial in airflow without collapsing humidity too quickly.
- Seedling heat mat: Bottom heat (70–75°F root zone) significantly accelerates rooting. The HBX Seedling Heat Mat pairs directly with the propagation tray setup.
- Lighting: Low-intensity LED bars or a T5 fixture positioned 12–18″ above the canopy. Avoid high-output LEDs without dimming capability — the intensity is excessive for rootless cuttings. Check our guide on the best T5 grow lights for options sized for propagation.


How to Take Cuttings: Step-by-Step
What you'll need
Before you begin, have all supplies sanitized and staged. Contamination at the cutting site is one of the most common failure points — dirty blades can introduce pathogens directly into the vascular tissue of both the cutting and the mother plant.
- Sharp, sterile scalpel or trimming scissors (isopropyl alcohol between every cut)
- Rooting gel or rooting hormone
- Starter plugs or rooting media (see media section below)
- Propagation tray and dome
- Clean container of pH-adjusted water (5.5–6.5 pH) for staging cuts
- Nitrile gloves
Step 1: Select your cutting sites
Look for shoots with 4–6 nodes and at least 3–4 inches of usable stem below the lowest node you’ll keep. Lower branches on the mother plant are generally preferred — they tend to carry higher auxin concentrations and root faster than tip cuttings from apical growth, though both work well.
Avoid shoots that are flowering, showing any stress symptoms, or are extremely thin and underdeveloped.
Step 2: Make the cut
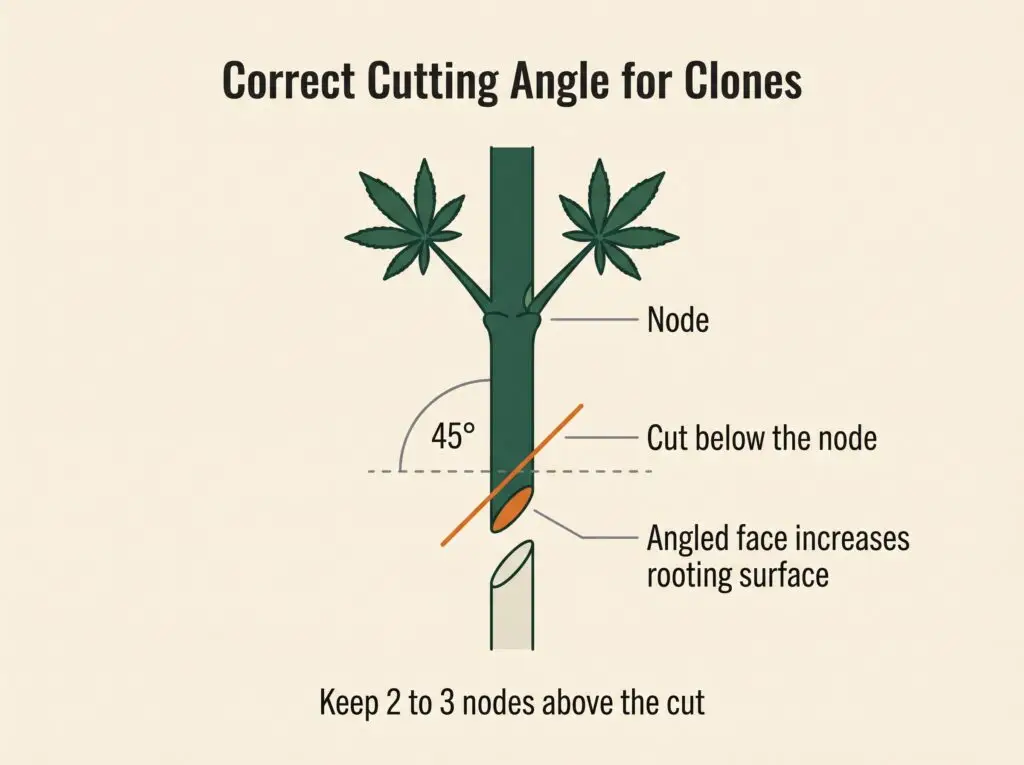
Using your sterilized blade, cut the shoot at a 45-degree angle — ideally just below a node. The angled cut serves two purposes: it increases the surface area available for rooting hormone contact and root emergence, and it reduces the chance of the stem sitting flat against the bottom of the plug and blocking oxygen exchange.
Cut cleanly in a single motion. Sawing or crushing the stem damages vascular tissue and reduces rooting rates.
Step 3: Stage your cuts in water immediately
Place each fresh cutting stem-down in a container of pH-adjusted water immediately after cutting. Exposure to air creates an air embolism in the stem’s vascular tissue — staging in water prevents this and buys you time to prep multiple cuttings before moving to the next step.
Step 4: Strip lower leaves and score the stem
Remove all leaves from the lower 1–2 inches of the stem — these would be buried in your growing medium and would rot. Keep 2–3 sets of leaves at the top, but trim large fan leaves by half. This reduces the cutting’s transpiration load while it lacks a root system.
Some growers also lightly score (scrape) the bottom inch of the stem with a blade or fingernail to expose more cambium tissue, which can increase root initiation sites. This step is optional but useful for strains or species that are slow to root.
Step 5: Dip in rooting gel
Remove the cutting from your water bath, shake off excess water, and immediately dip the bottom 1–1.5 inches of stem into your rooting gel. Do not double-dip directly into the container — scoop out a small amount into a separate vessel to avoid cross-contaminating your whole supply. Coat the stem completely and avoid wiping or rubbing the gel off.
Clonex Rooting Gel remains the industry standard — it delivers IBA (Indole-3-Butyric Acid) in a viscous gel matrix that seals the cut site and maintains direct hormone contact with the wound tissue while roots initiate. Read our full guide on how to use rooting hormones on cuttings for more on gel vs. powder vs. liquid formulations.
Step 6: Place in your rooting medium
Insert the coated stem into your prepared rooting plug or medium to a depth of roughly 1–1.5 inches — enough for stability, but not so deep that you’re burying nodes that should remain above the medium. See the media comparison below for which format fits your setup.
Step 7: Into the dome
Once your cuttings are placed, set the tray under your lighting, cover with the humidity dome, and vent minimally for the first 3–5 days. Begin cracking the vents slightly after day 5 to acclimate clones to ambient RH gradually.
Check daily for wilting, browning at cut sites, or mold growth. Wilting with dome on = possible air gap at stem/plug interface (re-seat the cutting). Mold = too much moisture with insufficient airflow (open vents slightly, reduce misting frequency).
Choosing Your Rooting Medium
Your choice of medium affects rooting speed, transplant ease, and how well clones integrate into their final growing environment.
Starter Plugs (Peat, Coco, or Foam-Based)
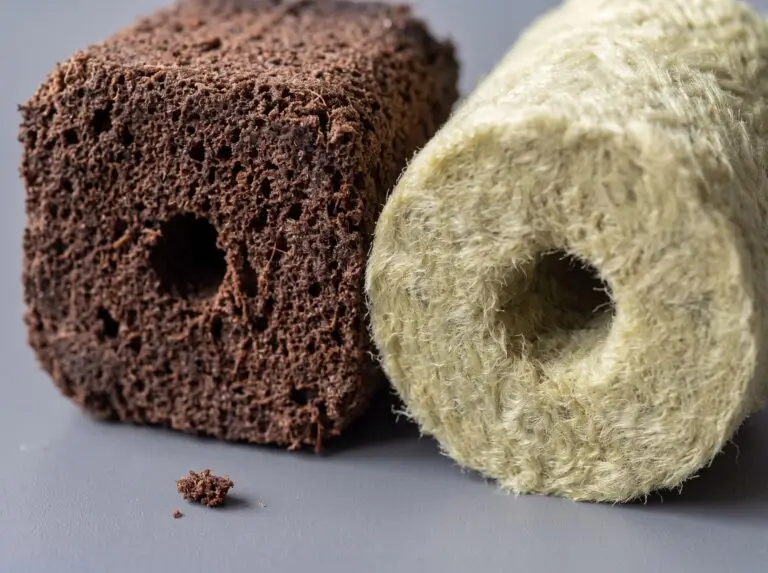
Starter plugs are the most beginner-friendly option — pre-formed, ready to use, and easy to transplant. They work well in tray/dome setups and transition cleanly into most growing media.
iHort Q-PLUG Starter Plugs are a co-op partner product and a top-performing option at Hydrobuilder. Made in the USA, iHort Q-PLUGs are formulated for consistent moisture retention and strong root development — they’re available in multiple cell sizes for hobby trays up to large commercial propagation formats. The prefilled tray options (like the IHORT 98 Prefilled Excel Plug Tray) eliminate prep time and standardize plug depth, which matters at scale.
HBX 50 Site Seedling Starter Kit with Root Plugs is a complete ready-to-go propagation tray setup — tray, inserts, and plugs included. Well-suited for hobby growers who want everything dialed without sourcing components separately.
Root Riot plugs (Hydrodynamics International Root Riot Plugs) are organic peat-based cubes popular for their natural microbial activity and consistent performance with a wide range of crops.
Rockwool Starter Cubes
Rockwool provides excellent aeration and water retention when properly prepared. It’s the dominant medium in commercial propagation and transitions seamlessly into rockwool slab growing for flowering.
Preparation is mandatory: Soak rockwool cubes in pH 5.5–6.0 water for at least 30 minutes to several hours before use to bring the naturally alkaline pH down. Never insert a dry or improperly pH’d cube — it will repel water and create root zone stress.
VidaWool Rockwool Starter Plugs are a co-op partner product and the dominant rockwool brand at Hydrobuilder by a significant margin. VidaWool’s 1.5″ starter plugs are purpose-built for propagation — consistent density, reliable moisture retention, and sized to drop directly into larger VidaWool blocks when transplanting into the veg environment.


Aeroponic Cloning Machines
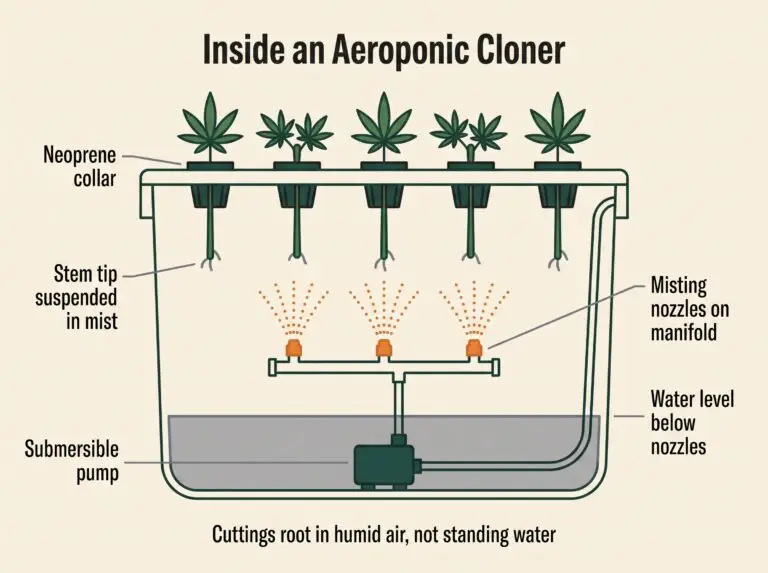
Aeroponic cloners suspend cuttings in neoprene collars while misting the bare stem with oxygenated water. This creates the ideal rooting environment: constant moisture contact, high dissolved oxygen, and zero medium compaction. Rooting times are consistently faster than plug or rockwool methods — most strains show white root primordia within 7–14 days under optimized conditions.
The tradeoff is cost and the need for active monitoring. Pump failures, reservoir temperature swings (keep reservoir between 65–72°F to prevent pathogen pressure), or clogged misters can wipe out a full batch quickly if undetected.
For in-depth machine comparisons, see our guide to the best cloning machines. If you want to build your own, our DIY cloning machine guide walks through the process.
In-stock options:
- Super Closet SuperCloner Cloning Machine — available in 14- and 50-site configurations; reliable workhorse machines for hobby to mid-scale use
- Psycloner Pro Aeroponic Cloning Machine — purpose-built aeroponic system with quality misters and a well-designed reservoir layout
How Long Do Clones Take to Root?
Expect visible root development in 7–14 days under proper conditions (72–78°F, 75–85% RH). Slower-rooting strains or species may take up to 21 days.
Signs your clone is rooting:
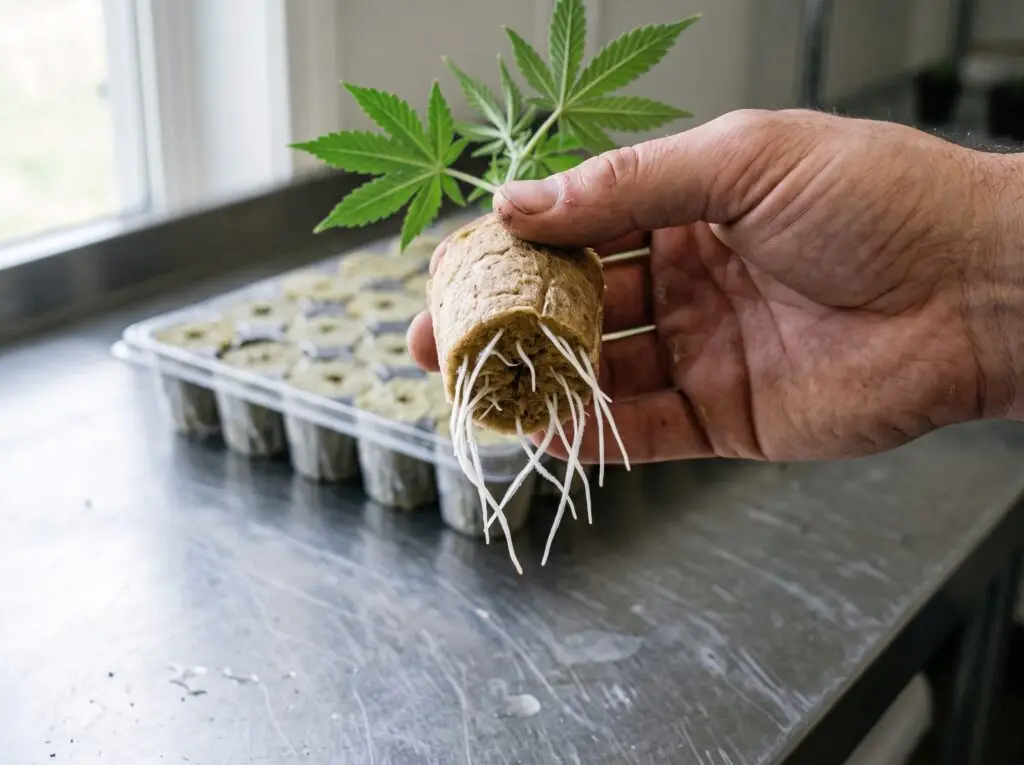
- White root tips emerging from the bottom of the plug or rockwool cube
- New leaf growth or internode elongation at the top of the cutting
- The cutting resists a very gentle upward tug (root structure anchoring)
- Cutting maintains turgidity without wilting even with dome vents open
Wait until roots are at least 1–2″ long and protruding through the medium before transplanting. Rushing transplant with underdeveloped roots is one of the most common causes of post-transplant stress and stalled veg growth.
Do not disturb cuttings unnecessarily during the rooting window. Check daily, but handle as little as possible.
Feeding Your Clones
During the first week, plain pH-adjusted water is sufficient for most cuttings. The plug or rockwool medium provides everything needed at this stage, and nutrient solution at any meaningful concentration will stress rootless cuttings.
From day 7 onward (or once you see root tips), you can begin introducing a dilute rooting/clone solution at 1/4 to 1/3 strength.
Clonex Clone Solution is formulated specifically for this window — it provides mineral nutrition alongside root-stimulating compounds without the nitrogen load of a standard veg nutrient profile.
For system users running aeroponic cloners, add clone solution to the reservoir from day 3–5. Keep EC below 0.8–1.0 and monitor for algae growth, especially in reservoirs exposed to any light.
For Commercial Operations
Dedicated Mother Plant Rooms
At commercial scale, mother plants aren’t maintained in the same space as the crop — they live in a dedicated veg room under 18/6 lighting, typically in 5–10 gallon containers. A well-managed mother plant room can supply hundreds of cuttings per week from a rotation of 8–20+ mother plants, depending on throughput targets.
Key considerations for mother plant management:
- IPM isolation: Mother plant rooms should have strict access controls. A single infected mother can compromise every clone batch until the source is identified.
- Sanitation protocol: All tools entering the mother room should be cleaned and sterilized with isopropyl alcohol (70%) between each plant. Never use a nutrient or rooting solution as a substitute for a proper sterilant.
- Canopy management: Mother plants benefit from regular training to maximize bud sites available for cloning — topping, LST, and strategic pruning keep the canopy productive.
- Rotation: Keep mother plants in veg for 3–6 months, then replace with clones of themselves (or fresh genetics) to prevent senescence-related performance decline.
Propagation Room Throughput Planning
For a commercial facility running perpetual harvest workflows, your propagation throughput has to match your plant count requirements per bench turnover. Plan backward from your target weekly plant count:
- How many plants do you flip per week?
- Add 15–20% buffer for expected failure rate
- That’s your minimum weekly cutting target
iHort prefilled tray formats are the industry choice for high-throughput propagation at scale — the pre-filled, standardized format eliminates inconsistent plug prep and gives propagation technicians a repeatable, auditable process. At Hydrobuilder, iHort prefilled trays are available in configurations from 36 cells to 144 cells to match your bench capacity.
Laminar Flow and Contamination Control
Commercial propagation rooms — especially those dealing with high-value genetics — benefit from laminar flow hoods for tissue culture work and any propagation from suspect or new genetics. The DL Wholesale Desktop Horizontal Laminar Flow Hood with HEPA Filter is available at Hydrobuilder and provides the HEPA-filtered airflow needed for pathogen-sensitive propagation environments.
Integrating Propagation with Crop Steering
Cuttings taken from mother plants maintained on a balanced vegetative nutrient profile — moderate nitrogen, adequate phosphorus and potassium — root more uniformly than cuttings from plants under heavy generative steering. If you’re using HGV dry nutrients in your mother plant room, the Grow formula provides the right balance of macronutrients for maintaining healthy, productive mother stock.
Troubleshooting Common Clone Problems
Wilting with dome on: Usually an air gap between the stem and plug — re-seat the cutting, ensuring the stem makes full contact with the medium. Can also indicate the cutting was left out of water too long before planting.
Yellowing leaves: Some lower leaf yellowing during rooting is normal as the clone depletes available stored nutrients before its root system can uptake new ones. Severe yellowing across all leaves suggests the medium was pre-charged with too-strong nutrient solution.
Rotting at the stem base: Overwatering or excess moisture in the medium without adequate drainage or airflow. Rockwool should be moist but never saturated. Plugs should feel like a wrung-out sponge.
No roots after 21+ days: Check: Was the rooting hormone applied? Is root zone temperature adequate (below 68°F dramatically slows rooting)? Was the mother plant over-nitrogenated? Were cuts made at the right location (at or just below a node)?
Mold on plug surface: Reduce misting frequency, crack dome vents slightly, improve air circulation. Mold at this stage is usually Botrytis or common saprophytic molds attracted to moisture — it signals the balance between humidity and airflow is off.
Why Shop Propagation Supplies at Hydrobuilder
Hydrobuilder carries the full propagation category — from individual plugs and rooting gels for a single hobby grower to iHort prefilled tray systems designed for commercial propagation rooms processing hundreds of cuts weekly. As an iHort co-op partner, we carry their complete Q-PLUG line including their commercial-scale prefilled Excel Plug Trays alongside VidaWool rockwool starter plugs, Clonex rooting products, and aeroponic cloning machines.
If you’re starting from scratch, check out our full cloning and propagation supplies collection.
FAQ SECTION
Q: What is the best way to clone a plant?
A: Aeroponic cloning produces the fastest, most consistent results — bare stems misted with oxygenated water typically root in 7–14 days under optimized conditions. For growers without a cloner, foam or peat-based starter plugs in a tray-and-dome setup are the most reliable low-cost method. Rockwool cubes work well in systems where clones will transition directly into rockwool production. All methods benefit from rooting gel, a heat mat targeting 70–75°F at the root zone, and 75–85% RH.
Q: How long does it take for a clone to root?
A: Under proper conditions — 72–78°F air temperature, 75–85% RH, adequate bottom heat — most clones show root development in 7–14 days. Some slow-rooting strains or species can take up to 21 days. Wait until roots are at least 1–2″ long before transplanting. Rushing transplant with underdeveloped roots causes post-transplant stress and stalled growth.
Q: Can you clone a plant in just water?
A: Yes — water cloning works by placing the cut stem in a container of clean, pH-adjusted water (5.5–6.5) and waiting for adventitious roots to form. It requires no medium or gel and works for many plants, though rooting time is typically longer (2–4 weeks) compared to aeroponic or plug methods. Change the water every 2–3 days to prevent bacterial buildup and stage the container in a warm, humid environment with indirect low-intensity light.
Q: Can a clone be used as a mother plant?
A: Yes. Clones can serve as mother plants and produce further cuttings indefinitely. Many growers maintain mother plants that are themselves clones of previous-generation mothers without any observable decline in vigor or quality — provided the mother remains in vegetative growth and maintains good health. The key is never cloning from stressed, deficient, or pest-infected plants regardless of generation.
Q: What makes a plant unsuitable for cloning?
A: A plant is a poor cloning candidate if it shows: nutrient deficiencies (especially nitrogen or magnesium), active pest infestation or disease, viral symptoms (mottled or distorted leaves suggesting HLVd or similar), or has been under heavy stress (extreme temps, root damage, overwatering). Autoflowering varieties are also typically not cloned — their flower timing is genetically fixed, so a clone will flower on the same schedule as the mother regardless of light cycle.
Q: What is the correct angle to cut a clone?
A: Cut at a 45-degree angle, just below a node, using a sharp sterile blade in a single clean motion. The 45-degree angle increases the exposed surface area for rooting hormone contact and root emergence points, and prevents the stem from sitting flat against the bottom of a plug and blocking oxygen exchange. Do not use blunt scissors or saw — crushed vascular tissue reduces rooting rates significantly.
Q: How often can I clone from the same mother plant?
A: A healthy mother plant kept in vegetative growth can supply cuttings repeatedly — every 2–4 weeks depending on how aggressively you strip her. Never take more than 30–40% of the plant’s shoot mass in a single cloning session. Allow the mother to recover and produce new growth between sessions. Well-managed mother plants can remain productive for 6–12 months before they show signs of senescence, at which point replacing them with a clone of the original is standard practice.
Q: Do I need to feed my clones nutrients right away?
A: No. During the first week, plain pH-adjusted water is all cuttings need. The plug or rockwool medium supplies enough mineral nutrition for initial root development, and nutrient solution at meaningful concentrations will stress rootless cuttings. Begin introducing a dilute clone-specific rooting solution (such as Clonex Clone Solution at 1/4 strength) only after root tips are visible — typically day 7–10.
Q: How do I prevent disease when cloning?
A: Sterilize all tools between cuts using isopropyl alcohol (70%). Wear nitrile gloves and change them between mother plants. Work with clean, sanitized trays and fresh medium each batch. Do not reuse plugs. For facilities at risk of Hop Latent Viroid (HLVd) or other pathogens, consider PCR testing of mother plants before committing to a full propagation run.