
Thrips are one of the most damaging pests in indoor and outdoor growing — and one of the easiest to miss until the population has already exploded. These slender, fast-moving insects feed on plant tissue, leaving behind characteristic silver scarring, black frass deposits, and distorted buds. They’re also vectors for serious plant viruses including Tomato Spotted Wilt Virus (TSWV) and Impatiens Necrotic Spot Virus (INSV), which means a thrips infestation can do lasting damage well beyond what you see on the leaves. Whether you’re growing vegetables, flowers, or cannabis, this guide covers how to get rid of thrips using a staged approach — from early detection and biological controls through targeted insecticide rotation for serious infestations.
Hobby growers: The identification and treatment steps below apply directly to your garden. Commercial cultivators: Jump to the Commercial Thrips Management Protocol section for facility-scale IPM guidance.

What Are Thrips and Why Are They Dangerous?
Thrips (order Thysanoptera) are tiny insects — most species measure under 1/20 of an inch — with narrow, fringed wings that make them capable fliers. Over 6,000 species exist worldwide, and while some are beneficial predators of mites and other insects, the species that target crops are highly destructive.
In indoor growing environments specifically, thrips are more threatening than in outdoor gardens because there are no natural predator populations keeping them in check. A single female can lay up to 300 eggs over her lifetime, depositing them directly into plant tissue where they’re invisible to most monitoring methods. Under warm conditions (75–85°F), a generation can complete in 10–20 days — meaning populations can escalate from a few adults to thousands within a single crop cycle.
Their virus vector status is equally serious. TSWV and INSV can spread through an entire crop within days once western flower thrips (Frankliniella occidentalis) — the most common commercial pest species — are present in numbers.
How to Identify Thrips Damage
The first signs of thrips are usually on the leaves and flowers, not the insects themselves. Look for these indicators:
Feeding damage signs:
- Silver or bronze stippling on upper leaf surfaces — caused by feeding on epidermal cells
- Papery, bleached patches that may look like light burn or nutrient deficiency if you’re not looking carefully
- Black specks of frass (excrement) on leaf surfaces and in flower clusters — one of the most reliable ID markers
- Distorted, curled, or asymmetrically developed leaves and buds in actively growing shoots
- Flowers that fail to open, or petals with brownish streaking and premature drop
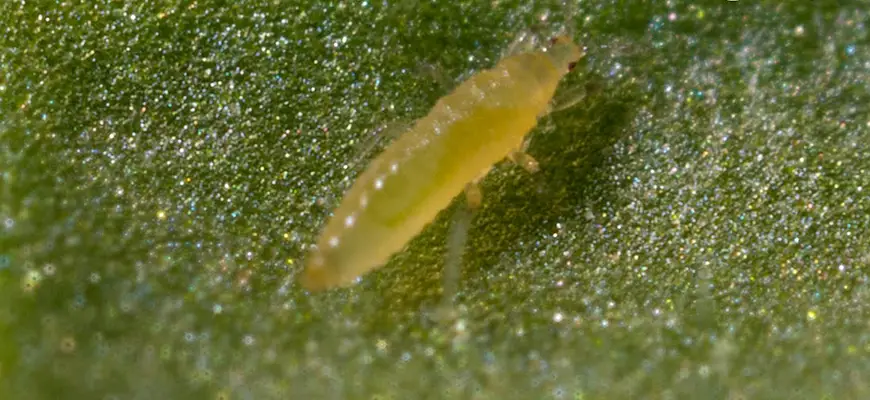
Finding the insects: Adult thrips are straw-yellow to dark brown depending on species, and they move fast when disturbed — leaping or flying off the plant. To find them, hold a white piece of paper under a stem and tap sharply. Any dislodged thrips will appear as tiny moving specks. You can also check flower interiors, where adults and nymphs cluster. Nymphs are pale yellow-green and even smaller than adults; they don’t fly.
Thrips vs. look-alike pests: Broad mites and russet mites cause similar stippling without frass. Spider mites leave webbing. Lace bugs leave cleaner, more uniform silver spots without the black excrement. If you’re unsure, a jeweler’s loupe (30–60x) will confirm thrips presence — look for the distinctive fringed wings on adults.
Always confirm your pest identification before treating. The wrong treatment wastes time, money, and can cause unnecessary plant stress.

Thrips Life Cycle: Why Treatment Timing Matters
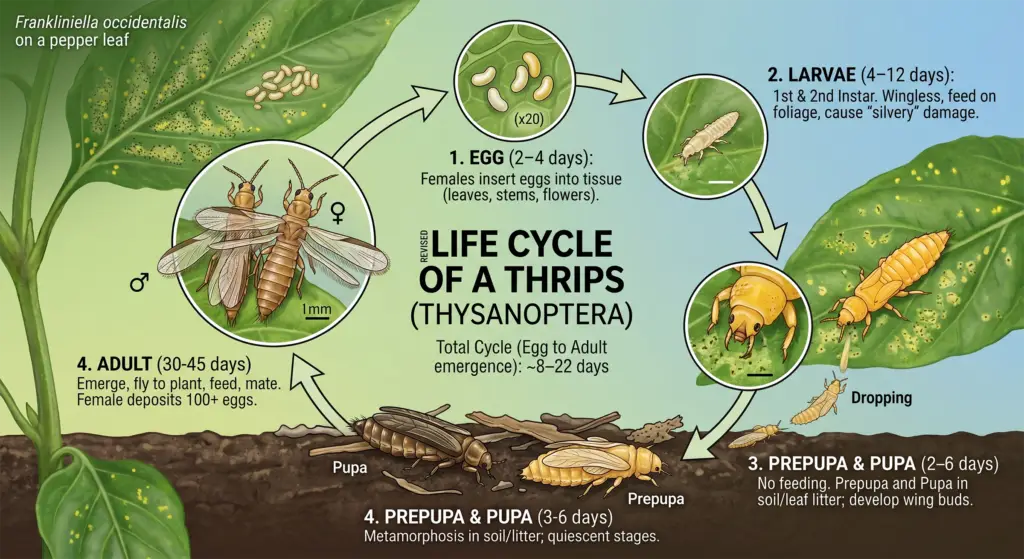
Understanding the thrips life cycle is what separates growers who solve infestations from those who keep fighting them. Thrips have six distinct life stages, and most treatments are only effective against specific stages.
| Stage | Location | Duration at 77° | Vulnerable to: |
|---|---|---|---|
| Egg | Inside plant tissue | 3–7 days | None — protected from contact |
| Larva 1 (1st instar) | Leaf surface, flowers | 2–4 days | Contact sprays, beneficials |
| Larva 2 (2nd instar) | Leaf surface, flowers | 3–5 days | Contact sprays, beneficials |
| Prepupa | Soil/growing media surface | 1–2 days | Beneficials (nematodes, soil mites) |
| Pupa | Soil/growing media | 3–5 days | Soil drenches, beneficial nematodes |
| Adult | Plant canopy | 30–45 days | Sticky traps, contact sprays, spinosad |
The soil stage (prepupa and pupa) is why foliar-only treatments fail on persistent infestations. You must address the canopy AND the growing media surface simultaneously.
Stratiolaelaps scimitus (predatory soil mites) are particularly effective for the soil phase.
Total life cycle at typical indoor temps (75–80°F): 15–20 days. Treatments applied every 7–10 days are timed to catch emerging larvae before they pupate and repopulate.
Step 1: Monitoring — Set Your Baseline Before You Treat
You can’t manage what you can’t measure. Before reaching for a spray, establish a monitoring baseline that tells you how severe the infestation is and where it’s concentrated.
HBX Yellow Sticky Traps are your primary early detection tool. Place one trap per 10–25 sq ft at canopy level. Yellow traps attract thrips, fungus gnats, whiteflies, and aphids — giving you a full picture of flying pest pressure. Check traps twice weekly and count adults. More than 5–10 adults per trap per week signals an active infestation requiring treatment intervention.
Blue sticky traps are sometimes cited as more attractive to western flower thrips specifically — this is true in research settings, but yellow traps catch a broader pest spectrum and remain the standard for general monitoring programs. For dedicated thrips surveillance in commercial settings, blue traps can be used as a supplement.
Document trap counts with dates so you can see whether your treatment program is working. Flat or rising counts after two treatment cycles means you need to rotate chemistry or add biological controls.

Step 2: Cultural Controls — Remove the Reservoir
Before applying any treatment, reduce the thrips population mechanically. This reduces the pressure on your biological and chemical controls.
Prune and remove heavily infested material. Flowers and young growing tips harbor the highest populations. Remove these and seal them in a bag before disposing — do not compost thrips-infested plant material, as this can spread both the insects and any viruses they carry. Pruning back 20–30% of infested tissue in a heavy infestation meaningfully reduces the population your treatment has to address.
Avoid over-pruning, which triggers a flush of new, tender growth that’s highly attractive to thrips.
Spray plants down with water. A strong spray of water — particularly on the undersides of leaves — knocks adults and larvae off plant surfaces. It won’t eliminate an infestation, but it reduces population density before you apply a treatment and improves contact spray efficacy by dislodging insects to surfaces where they’ll encounter the active ingredient.
Clean up plant debris and soil surfaces. Thrips pupate in the top inch of soil and in plant debris on the floor. Remove fallen leaves, sanitize the floor and benching between crop cycles, and top-dress or replace the surface layer of growing media in heavy infestations.
Step 3: Biological Controls
Introducing or conserving beneficial insects is the most sustainable thrips control strategy available — and in indoor environments, it’s highly effective because there’s no dilution from wind or weather. Beneficial programs work best as prevention and early-stage control; they’re harder to establish in severe infestations.
Orius insidiosus (minute pirate bug) — The most effective thrips predator available commercially. Orius attacks thrips at all life stages including eggs, actively consuming multiple thrips daily. Releases of 0.1–1 per sq ft in vegetative or early flowering stages can help establish a self-sustaining population under good conditions (adequate humidity, no broad-spectrum pesticide use for 2–4 weeks prior).
Amblyseius cucumeris (predatory mite) — Specializes in first-instar thrips larvae. Releases at 5–50 per sq ft, with preventative programs starting at the lower end of this range, work best as preventative applications or for light-to-moderate infestations. Compatible with most selective bioinsecticides.
Stratiolaelaps scimitus — Soil-dwelling predatory mite that targets thrips pupae in the growing media. Apply at 100–250 per sq ft directly to the media surface. Learn more in our guide to Stratiolaelaps scimitus.
Beneficial nematodes — Steinernema feltiae specifically targets the soil stages of thrips. Apply as a media drench at the recommended rate and keep the media moist for 2 weeks post-application.
For a full overview of beneficial insect options, see our guide to beneficial bugs.
Step 4: Organic and Biological Insecticides
When populations are established and biological controls alone aren’t keeping pace, targeted bioinsecticides bridge the gap. These options are generally compatible with beneficial insect programs when applied correctly and with appropriate re-entry intervals.
BioSafe AzaGuard
BioSafe AzaGuard is an azadirachtin-based insecticide and nematicide with dual-mode action: it acts as a feeding deterrent and disrupts molting hormones (ecdysone), preventing larvae from developing to the next stage. It’s OMRI Listed and effective across the thrips life cycle including eggs.
Apply as a foliar spray at 1–2 oz per gallon, focusing on leaf undersides and interior flower tissue where thrips and larvae concentrate. Repeat every 7–10 days. AzaGuard also has nematicidal properties that help address soil-stage populations when applied as a root drench alongside foliar applications. Do not apply in direct light — early morning or lights-off applications prevent photodegradation and reduce phytotoxicity risk.
BioSafe BioCeres WP
BioSafe BioCeres WP is a biological mycoinsecticide based on Beauveria bassiana, a naturally occurring entomopathogenic fungus. It works by contact — spores attach to the thrips cuticle, penetrate the exoskeleton, and kill within 3–10 days. Because its mode of action is entirely different from conventional insecticides, it has no cross-resistance with other chemistry. It’s an ideal rotation partner for AzaGuard or spinosad-based products.
Apply at 0.5–1 lb per 100 gallons with a spreader-sticker. Maintain relative humidity above 60% for 8–12 hours after application to support fungal germination. BioCeres is compatible with beneficial mite releases when used at labeled rates.
Lost Coast Plant Therapy
An insecticidal soap concentrate formulated with plant-based essential oils that disrupts thrips through direct contact and suffocation. Effective against adults and larvae on contact — spray directly onto insects at canopy level and leaf undersides. Excellent as a knockdown spray to reduce adult populations quickly before introducing biological controls.
Application note: All foliar sprays should be applied with equipment calibrated for thorough coverage. For grow areas up to 150 sq ft, the HBX Handheld Pump Sprayer provides precise spot-treatment control. For larger canopies, the HBX Pump Sprayer 8 Liter delivers consistent coverage at the volume commercial applications require.


Step 5: When to Escalate to Conventional Insecticides
If biological controls and OMRI-listed bioinsecticides haven’t brought populations below threshold within two treatment cycles (14–20 days), it’s time to escalate chemistry. Spinosad and conventional insecticides labeled for thrips are highly effective, but resistance development is a real risk — always rotate active ingredients and return to biological controls as soon as populations decline.
Spinosad (active ingredient in products like Monterey Garden Insect Spray) — Highly effective against thrips larvae and adults. Works via neural disruption. 24-hour re-entry interval. Avoid applying near pollinators as spinosad has high contact toxicity to bees; apply at dusk or with supplemental lighting off.
Pyrethrin/pyrethroid-based products — Effective knockdown but with minimal residual activity and no effect on eggs or pupae. Use as an emergency reset, not as a primary control strategy.
For any conventional insecticide use, follow all label requirements for pre-harvest intervals (PHI) and re-entry intervals (REI), particularly in food crop and licensed cannabis cultivation settings.
How to Prevent Thrips
Prevention costs far less than treatment. In controlled indoor environments, these protocols significantly reduce infestation risk:
Quarantine incoming plant material. Any new plant, clone, or transplant should be isolated for 7–14 days before being introduced to the main growing area. Inspect thoroughly for adults, frass, and feeding damage at the time of introduction and again at day 7.
Run yellow sticky traps as permanent fixtures. Monitoring is not optional — it’s the only way to catch thrips before populations reach damaging levels. Replace traps every 2–4 weeks regardless of apparent pest pressure.
Sanitize between crop cycles. Thrips pupae survive in organic debris and growing media. Between cycles, remove all plant matter, sanitize surfaces and benching with
BioSafe ZeroTol 2.0 — a broad-spectrum algaecide, bactericide, and fungicide registered for use in licensed facilities — and replace or thoroughly flush growing media.
Maintain environmental conditions that discourage thrips. Thrips populations grow fastest in warm, dry conditions. Maintaining canopy relative humidity at 55–70% (appropriate for late vegetative/early flowering stages) slows reproduction. Good air circulation also disrupts thrips movement and makes foliar applications more effective.
Don’t use fresh green mulch in outdoor growing areas — it attracts thrips. Dry mulch is fine.
For a complete prevention framework, see our guide to integrated pest management and most common grow room pests and diseases.
Commercial Thrips Management Protocol
For licensed cannabis facilities, large-scale vegetable and flower production, and commercial indoor operations.
At commercial scale, thrips management is an IPM system — not a product decision. Reactive treatment is expensive and often ineffective; a proactive program with consistent monitoring, scheduled beneficials, and strategic chemistry rotation is what keeps facilities in compliance and prevents crop losses.
Commercial Monitoring Standards
Place HBX Yellow Sticky Traps at 1 trap per 10–25 sq ft across the canopy. Log counts twice weekly per room. Establish action thresholds: 5 adults per trap per week = intervention required. 20+ adults per trap per week = escalate to foliar treatment immediately.
Assign monitoring rounds to the same crew member(s) each week — consistency in counting methodology matters for trend tracking.
Commercial Treatment Rotation
Resistance development is the primary risk in commercial settings where the same chemistry is applied repeatedly at scale. Rotate active ingredients on a 2–3 week cycle:
- Rotation A (Weeks 1–2): BioSafe AzaGuard (azadirachtin) — foliar + drench
- Rotation B (Weeks 3–4): BioSafe BioCeres WP (Beauveria bassiana) — foliar
- Rotation C (as needed): Athena IPM or spinosad-based product — foliar
Athena IPM is a citric acid and rosemary oil-based pesticide and fungicide that addresses thrips alongside powdery mildew and other foliar pathogens in a single application — useful for multi-pest pressure scenarios common in flowering rooms.
Beneficial Insect Program
Scheduled beneficial releases reduce the dependency on chemical inputs and support regulatory compliance in licensed facilities:
- Amblyseius cucumeris: Weekly or bi-weekly releases at 5–50 per sq ft starting at week 1 of vegetation, scaling to higher rates under heavier pressure
- Orius insidiosus: Releases at 0.1–1 per sq ft at start of vegetation; maintain banker plants (sweet alyssum) to support populations
- Stratiolaelaps scimitus: Monthly soil application at 100–250 per sq ft to address pupating populations
- Steinernema feltiae nematodes: Media drench at planting and again 30 days later
More details on running a beneficial insect program in our beneficial bugs guide.
Room Turnover Sanitation
Between each crop cycle, run a full room sanitation protocol:
- Remove all plant material and organic debris
- Treat all surfaces (benches, walls, floors, trays) with BioSafe ZeroTol 2.0 at the labeled facility application rate
- Use Prokure Gchlorine dioxide gas treatment for full-room air and surface sanitation — particularly effective for reaching cracks, crevices, and HVAC components where thrips pupae can harbor. Prokure G releases as a fast-acting ClO₂ gas; follow all manufacturer safety protocols during and after application
- Replace or steam-sterilize growing media if using rockwool or coco slabs
Commercial Application Equipment
At commercial scale, application consistency determines treatment efficacy. The HBX Pump Sprayer 8 Liter handles most multi-room IPM programs. For facilities with 5,000+ sq ft of canopy, a backpack sprayer or automated boom sprayer calibrated for uniform coverage is appropriate.
Require HBX Nitrile Gloves for all crew members handling insecticides and sanitizers — 6 mil construction provides chemical barrier protection while maintaining the dexterity needed for application work.


Why Shop at HydroBuilder for IPM Supplies
HydroBuilder carries the complete BioSafe Systems product line — AzaGuard, BioCeres WP, ZeroTol 2.0, and SaniDate 5.0 — along with Prokure, Athena IPM, and the full range of HBX monitoring and application equipment. Our team works directly with commercial cultivators and can help you build a compliant IPM program matched to your facility scale and crop type. Call us at 888-815-9763 with questions, or browse our insecticides and pest control collection for the full selection.
Frequently Asked Questions About Thrips
Q: How do I know if I have thrips on my plants?
A: Look for silver or bronze stippling on upper leaf surfaces, black specks of frass on leaves and inside flowers, and buds or young leaves that appear distorted or fail to develop normally. To confirm, hold white paper under a stem and tap sharply — dislodged thrips will appear as tiny moving specks. A 30x loupe will reveal the narrow, fringed wings that identify adults.
Context: These symptoms are often mistaken for light stress, calcium deficiency, or broad mite damage. The black frass is the most reliable differentiator. In indoor grows, check the undersides of the youngest leaves first — that’s where feeding concentrates.
Commercial note: In licensed cannabis facilities, unexplained stippling should always trigger pest ID confirmation before treatment, as misidentified broad mite damage has led to incorrect pesticide applications and PHI violations.
Q: What kills thrips instantly?
A: Pyrethrin-based insecticides and spinosad provide the fastest contact kill of thrips adults and larvae. Insecticidal soaps and essential oil concentrates (like Lost Coast Plant Therapy) also kill on contact. However, no product kills thrips eggs, which are laid inside plant tissue and protected from sprays — meaning any “instant kill” treatment must be followed by repeat applications 7–10 days later to catch emerging larvae before they reproduce.
Commercial note: “Fast kill” chemistry often comes with resistance development risk. Use rapid-knockdown products as an emergency reset, then transition to a rotation program.
Q: Can thrips live in soil?
A: Yes — thrips prepupae and pupae drop from the plant and complete their development in the top inch of growing media. This soil-stage population is invisible to monitoring and protected from most foliar spray applications. Treatments targeting the soil phase — beneficial nematodes (Steinernema feltiae), predatory soil mites (Stratiolaelaps scimitus), or media drenches with azadirachtin — are essential for breaking the life cycle in persistent infestations.
Context: This is the most overlooked aspect of thrips management. Growers who treat foliage only often see an initial population drop followed by reinfestation from emerging pupae 2 weeks later.
Q: Do thrips fly?
A: Adult thrips have two pairs of fringed wings and can fly short distances — typically 1–3 meters under their own power. In enclosed growing environments, airflow and HVAC systems can carry them much further. This is why a single infested plant in a multi-room facility can seed an entire operation within days if not identified and quarantined promptly.
Q: Will neem oil get rid of thrips?
A: Azadirachtin (the active compound in neem oil extracts like AzaGuard) disrupts thrips molting and acts as a feeding deterrent — it will reduce populations significantly with repeated applications. Crude neem oil with high azadirachtin content is effective; cold-pressed neem used purely as a carrier oil has minimal insecticidal activity. For reliable results, use a concentrated azadirachtin extract at labeled rates rather than home-diluted neem oil, and apply every 7–10 days to catch emerging generations.
Q: What are the best natural predators for thrips control?
A: Orius insidiosus (minute pirate bug) is the most effective biological control agent for thrips — it attacks all life stages including eggs and can establish self-sustaining populations in indoor environments. Amblyseius cucumeris predatory mites specialize in first-instar larvae and are widely used in preventative programs. For soil-stage control, Stratiolaelaps scimitus and Steinernema feltiae nematodes address the pupal population that foliar treatments can’t reach.
Commercial note: Compatible predator programs require avoiding broad-spectrum pesticides for 2–4 weeks before and after releases. Plan your chemistry rotation around your beneficial release schedule.
Q: How do you get rid of thrips on cannabis plants?
A: The same staged approach applies: sticky trap monitoring → cultural controls (pruning, water spray) → biological treatments (AzaGuard, BioCeres WP, beneficial insects) → escalation to spinosad or conventional chemistry only if needed. In cannabis cultivation specifically, confirm all products are labeled for use on cannabis in your state and check pre-harvest intervals carefully — azadirachtin products like AzaGuard generally have no residue concerns at labeled rates, but always verify against your facility’s pesticide compliance list.
Commercial note: TSWV and INSV — both transmitted by western flower thrips — can devastate a cannabis crop beyond just the direct feeding damage. Early thrips control is a disease prevention measure, not just a pest management measure.
Q: Is thrips damage permanent?
A: In most cases, leaves that have already been damaged will not recover — the silver-scarred tissue remains. However, healthy plants that have been successfully treated will produce clean new growth within 2–4 weeks. In high-value crops like cannabis or orchids, if infestation is caught early and treated aggressively, the impact on final yield and quality can be minimal. Severe infestations during flowering can cause permanent damage to buds and flowers that won’t resolve before harvest.
Q: How long does it take to get rid of thrips?
A: Expect 3–6 weeks to fully break a thrips infestation under a consistent treatment program. The timeline is driven by the life cycle: eggs laid before treatment begins will still hatch, requiring you to catch and kill larvae through at least 2–3 treatment cycles. If beneficial insects are introduced simultaneously, they extend control beyond the treatment window. Populations should be declining measurably on sticky trap counts within 2 weeks of starting treatment.
Q: Can thrips spread from plant to plant?
A: Yes — adults fly and crawl actively, and infestations spread quickly through a canopy. In outdoor gardens, wind assists spread. Indoors, HVAC and airflow accelerate it, and any plant contact between infested and clean plants creates a direct transmission pathway. Isolate any plant with confirmed infestation immediately, and treat the entire grow area — not just the affected plant.