Use the calculator below to find the precise CO2 flow rate for your grow room or tent — then use the guide to dial in delivery method, controllers, and target PPM for your stage of growth.
Carbon dioxide is one of the most powerful yield levers available to indoor growers, but only when applied with precision. The CO2 calculator on this page takes your room dimensions, ambient CO2 level, and target PPM and outputs the exact flow rate you need — whether you’re running a compressed tank, a propane or natural gas generator, or a passive enrichment method.
Whether you grow in a 4×4 tent or manage a multi-room commercial facility, supplemental CO2 enrichment — when paired with adequate lighting and a sealed environment — can improve growth rates by up to 20–30% under optimized conditions (strong lighting at ≥600 µmol/m²/s, temps around 80–90°F, and sealed or well-sealed rooms with balanced nutrition and irrigation).
Not sure CO2 is the right next step for your grow? If you’re still dialing in humidity, VPD, or airflow, start there first. Check our VPD Calculator and Chart, our Grow Room Humidifier Sizing Calculator, and our Fan and Ventilation Setup Guide before adding CO2 to the equation.
How to Use the CO2 Calculator
The calculator requires three inputs:
- Room dimensions (length × width × height in feet) — to calculate volume in cubic feet.
- Ambient CO2 level — typically around 400–420 ppm outdoors; sealed rooms without supplementation may drift lower once plants have consumed available CO2.
- Target CO2 PPM — your desired enrichment level (see target ranges below).
The calculator outputs:
- CO2 volume needed (in cubic feet of CO2 gas mixed into room air) to bring your room from ambient to target, based on the standard relationship: room volume (cu ft) × PPM increase ÷ 1,000,000.
- Flow rate (cu ft/hr) based on your desired dosing window, so you can match requirements to tank regulators or generator ratings.
- Estimated daily gas cost for tank and generator methods, so you can compare operating expenses before committing to equipment.
Note: All output values assume a fully sealed room with no active air exchange during dosing and good air mixing. Open-loop systems with active exhaust will require higher effective flow rates or continuous/near-continuous dosing to maintain target PPM, and enriched air will be exhausted more quickly. Results are estimates — real-world variables including leakage, plant uptake, air mixing, and lighting heat load will affect actual performance.
Should You Be Supplementing CO2?
The short answer: CO2 supplementation benefits growers running high-intensity lighting in sealed or semi-sealed environments. It provides little sustained benefit in open-loop grow rooms with constant air exchange, or in spaces running low-intensity lights like T5s or CFLs, because enriched air is quickly exhausted or plants are light-limited.
The determining factor is your lighting system. CO2 enrichment only produces measurable results when plants can actually use the extra carbon — and that requires a photon flux your lights can deliver. If your lights are the current limiting factor in your grow, fixing that first will usually produce better ROI than adding CO2.
CO2 supplementation is worth pursuing if:
- You’re running LED, HPS, CMH, or LEC lighting at approximately ≥600 µmol/m²/s at the canopy.
- Your room is sealed or can be sealed during lights-on hours (minimal uncontrolled air exchange, good mixing).
- You already have temperature, humidity, and VPD dialed in within cannabis-appropriate ranges.
- You can maintain daytime canopy-level temperatures in the 80–90°F range during CO2 enrichment, since elevated CO2 allows and often benefits from slightly warmer conditions.
Skip CO2 enrichment for now if:
- You’re running T5, CFL, or low-wattage LED fixtures that cannot deliver adequate PPFD.
- Your room uses constant high-rate air exchange (open-loop ventilation) and cannot be sealed for enrichment windows.
- Temperature and humidity aren’t yet under control or regularly drift outside optimal cannabis ranges.
- You’re in early propagation or seedling stages, where young plants with limited root mass see minimal benefit from aggressive CO2 enrichment.
For hobby growers, upgrading from low-intensity to high-intensity lighting often delivers better ROI than adding CO2 to an underpowered setup. Our
Grow Room Atmosphere and Ventilation Guide covers this decision in depth.
Target CO2 PPM by Growth Stage
CO2 concentrations above ambient drive faster photosynthesis, but the optimal range depends on your stage of growth and your lighting intensity.
Performance outcomes at these ranges assume optimal lighting, temperature (80–90°F during CO2 enrichment), and RH/VPD within target bands. Results will vary by cultivar, system type, and environmental control precision.
CO2 is generally most impactful during vegetative growth and the first six weeks of flowering. For most operations, this means designing your supplementation program around lights-on hours during veg and early-to-mid bloom, then tapering or cutting CO2 in the final two weeks of flower when metabolite concentration and finish quality matter more than raw biomass gain.
CO2 Delivery Methods: Tanks, Generators, and Passive Bags
There are three main ways to supplement CO2 in an indoor garden. Each has different upfront costs, operating costs, control precision, and scale thresholds.
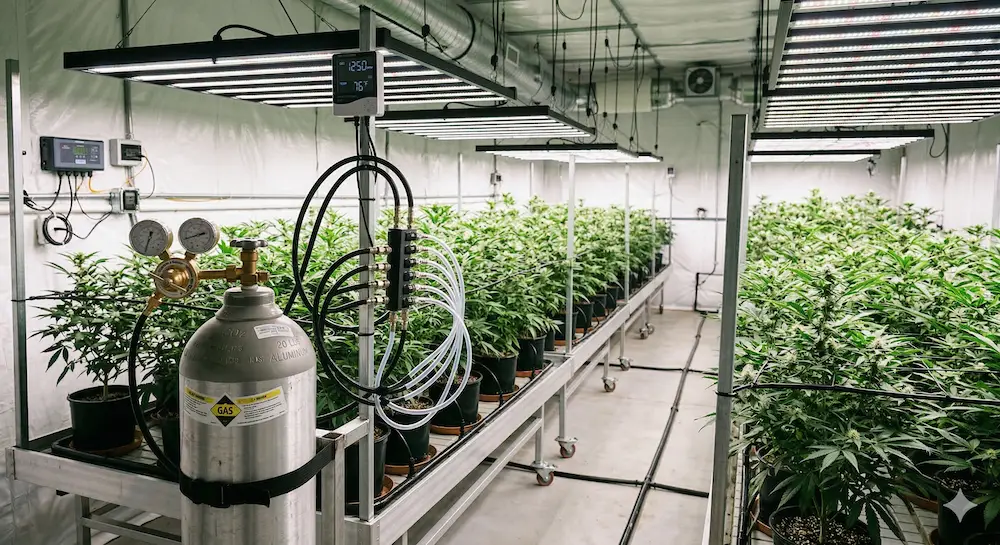
Compressed CO2 Tanks
Compressed tanks paired with a regulator and controller are the most precise delivery method for grow tents and small-to-medium rooms. Gas releases in measured, controlled bursts, and the system can be automated to maintain exact PPM setpoints within your target band.
The Autopilot CO2 Monitor & Controller is the top-selling CO2 controller in this category, combining a monitor and controller in a single unit with a 15-foot remote sensor. It maintains your target PPM automatically, activating your tank regulator when CO2 drops below setpoint and cutting it off when the target is reached. At temps between roughly 75–90°F in a sealed room with high-intensity lighting, this controller-and-tank combination delivers consistent, measurable results at room sizes up to several hundred square feet when properly sized and mixed.
Tanks require periodic refills from a local supplier (typically beverage-grade CO2). Operating costs scale with room size, target PPM, enrichment schedule, and sealing quality — use the calculator above to estimate your daily gas consumption and monthly cost before committing to a tank system.
For complete setup, pair a controller with the Covert CO2 Regulator and a drip tubing distribution system to ensure even gas dispersal across the canopy.
CO2 Generators (Propane and Natural Gas)
Propane and natural gas generators are the preferred delivery method for large grow rooms, greenhouses, and commercial facilities. Burners produce CO2 as a byproduct of combustion, along with heat and water vapor — which means generator selection must account for the additional heat and humidity load they add to the environment.
The Autopilot CO2 Generator, 4 Burner – LP produces 9,052 BTU and approximately 10.6 cu ft/hr of CO2 output, which the manufacturer rates for spaces around 14′ × 14′ and smaller under typical ceiling heights. At about 10.6 cubic feet per hour of output and a typical example room volume of roughly 8,000 cubic feet, this unit can typically enrich a well-sealed room from ambient (around 400 ppm) to common target levels near 1,000–1,200 ppm within well under an hour when properly controlled and mixed, though actual time will vary with room tightness, exhaust, and air circulation.
Generator-based systems require automatic CO2 controllers for accurate PPM management and to coordinate enrichment with exhaust and HVAC equipment. The
Titan Controls Atlas 9 CO2 Controller pairs with most generators and includes a remote sensor for accurate zone monitoring. For large-scale operations running multiple rooms, the
TrolMaster Hydro-X Environmental Control System integrates CO2 control with temperature, humidity, and lighting automation from a single platform.
Important: CO2 generators produce significant heat and water vapor as combustion byproducts. Always account for this added thermal and humidity load in your HVAC and dehumidification design; for example, an LP generator in the 4–8 burner class adds on the order of 9,000–18,000+ BTU/hr that must be removed to maintain target temperatures. See our
Grow Room Air Conditioner Sizing Guide for BTU calculation methods that include CO2 generator heat load.
Passive CO2 Bags and Small-Room Kits
For hobby growers, micro tents, and propagation areas, passive CO2 enrichment methods offer a low-cost entry point. CO2 bags use a mycelium culture to produce CO2 through natural off-gassing — no regulator or controller required, though a monitor is still recommended for visibility.
The Active Air 20 lb. Easy CO2 Enrichment Kit is sized for small grow tents and rooms, delivering passive CO2 without gas lines or regulators. While output and PPM control are less precise than tank or generator systems, passive bags are a legitimate starting point for growers testing CO2 supplementation before committing to a full delivery system.
For a step up in volume, the ExHale XL CO2 Bag offers longer-duration passive enrichment for medium-sized tents. Neither passive system is recommended for rooms larger than approximately 100 sq. ft., as CO2 output generally cannot keep pace with room volume or consumption at larger scale.
CO2 Controllers: Automating Your Enrichment Program
Running CO2 without a controller or at least a monitor is inefficient and potentially unsafe. CO2 controllers track your room’s actual PPM level and activate your delivery system only when needed — preventing CO2 depletion during peak photosynthesis and preventing dangerous or wasteful over-enrichment above your chosen thresholds.
The Autopilot CO2 Monitor & Controller remains the most accessible dedicated CO2 controller for small-to-medium operations. Set your high and low PPM setpoints, connect your tank regulator or generator, and the unit handles the rest.
For operations already running multi-channel automation, integrating CO2 management into your existing environment controller eliminates equipment redundancy. The TrolMaster Hydro-X CO2 Sensor adds CO2 monitoring and automation to any Hydro-X system, enabling coordinated control of CO2, temperature, humidity, lighting, and irrigation from a single interface.
Track temperature and humidity alongside CO2 levels at every monitoring point with the HBX Thermo-Hygrometer with LCD Display. The HBX Thermo-Hygrometer stores Min/Max values — essential for tracking environmental swings between lights-on and lights-off cycles, particularly in CO2-enriched rooms where temperature differentials directly impact plant response.
CO2 Safety: What Every Grower Needs to Know
CO2 is colorless, odorless, and heavier than air. It accumulates at floor level and in low-lying areas. At elevated concentrations, it poses a serious risk to anyone entering the grow space — and because you cannot see or smell it, you will not know it’s dangerous without a monitor.
Essential safety protocols for CO2-enriched grow rooms:
- Always install a dedicated CO2 alarm outside the grow room entrance. An alarm mounted outside can warn you before you enter the space; a monitor mounted only inside may not help if you’re incapacitated before reaching it.
- As a conservative operating practice, avoid exceeding roughly 2,000 ppm in any room where humans will be present for more than brief tasks, even though OSHA’s permissible exposure limit for CO2 is 5,000 ppm over an 8-hour workday and 30,000 ppm for a short-term exposure ceiling.
- Use a timer or CO2 controller to cut enrichment when lights go off. Plants do not photosynthesize in the dark and cannot use CO2 at night; running generators or tanks lights-off wastes gas and can elevate human exposure risk in sealed rooms.
- Vent the room before entry if you have any uncertainty about current CO2 levels. Running exhaust fans for 10–15 minutes before entering a sealed, enriched room adds a margin of safety.
- Always run CO2 enrichment with a sealed or semi-sealed room design paired with a reliable CO2 monitor and controller. Do not rely on unmonitored CO2 enrichment in an open-loop ventilated space — enriched air will simply be exhausted, and you lose visibility into actual exposure.
For Commercial Operations: Scaling CO2 Across Multiple Rooms
CO2 enrichment at commercial scale introduces challenges that don’t exist in single-room grows: generator sizing across zones, independent PPM management per room, coordinated shut-off during exhaust cycles, and safety compliance for staff access.
Commercial CO2 Workflow:
- Calculate room volume for each zone independently. Use the calculator above for each room — do not aggregate across rooms unless CO2 delivery is truly centralized and air is fully shared.
- Size generators to room volume and target PPM using manufacturer guidance and a safety margin. The Autopilot CO2 Generator, 8 Burner – LP produces 18,104 BTU and about 21.2 cu ft/hr of CO2, which the manufacturer rates for spaces around 28′ × 28′ and smaller; add a 15–20% capacity buffer to account for real-world leakage and imperfect mixing.
- Integrate CO2 control with facility-wide automation. The TrolMaster Hydro-X Environmental Control System supports CO2, temperature, humidity, and lighting control across multiple zones from a centralized interface. Use the TrolMaster Hydro-X CO2 Station to expand CO2 monitoring and control to additional rooms within the same Hydro-X network.
- Build CO2 heat load into your HVAC design. Each propane burner in a CO2 generator adds on the order of 1,000–1,500 BTU/hr to room heat load; an 8-burner LP generator adds roughly 18,000 BTU/hr that your cooling system must handle. See our Grow Room Air Conditioner Sizing Guide for the BTU formula and examples.
- Train staff on CO2 safety protocols. Every person who accesses CO2-enriched rooms should know the safety procedures, understand the risks of elevated CO2, and have access to current monitoring data before entering.
- Automate exhaust and re-enrichment cycles. Connect exhaust fans to your CO2 controller or central automation so that exhaust cycles automatically pause CO2 delivery and resume enrichment only when dampers close; most commercial-grade controllers support this, and the TrolMaster Hydro-X handles it via device station automation.
For a full guide on automating your grow environment beyond CO2, see our Grow Room Automation Guide.
Why Shop at HydroBuilder for CO2 Equipment
HydroBuilder carries the full range of CO2 equipment — from passive bags for hobby tents to multi-burner generators for large commercial facilities — backed by a team of cultivation advisors who help you match the right system to your actual room. Whether you’re sizing a system from scratch or scaling an existing setup, our team is reachable by phone at 888-815-9763 or by email at support@hydrobuilder.com.
We stock the controllers, regulators, sensors, generators, tanks, and distribution tubing you need to run a complete CO2 program — and our Learning Center resources, including this calculator, are designed to help you get the most out of every piece of equipment you run.