
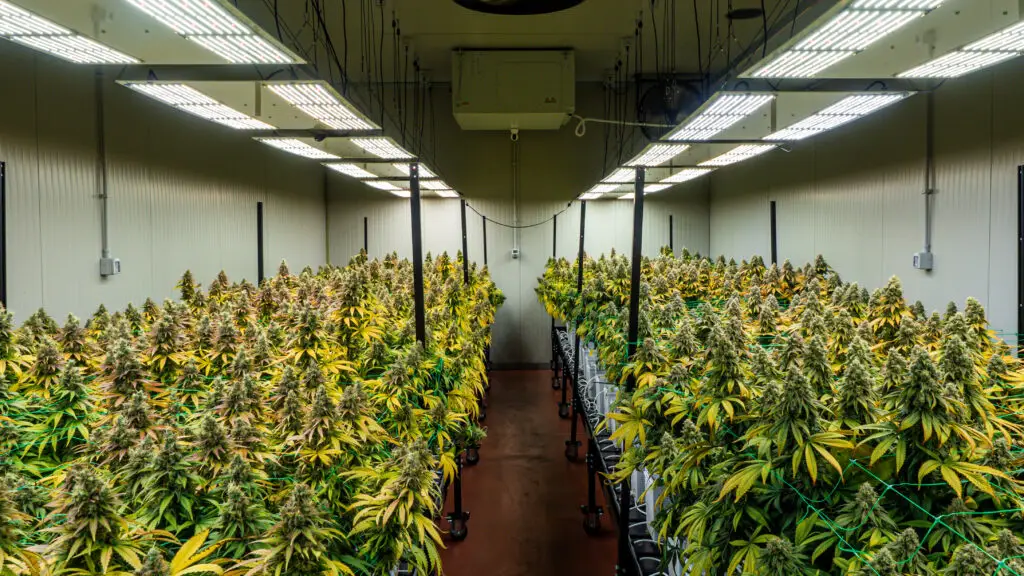
Every grower wants to increase cannabis yield — but most advice stops at “get better lights” or “train your plants.” That is useful as far as it goes, yet consistently hitting around 1.0 gram per watt or better typically requires alignment across five interconnected pillars: light, nutrition, environment, irrigation, and root-zone management. Miss any one of them and the others usually cannot fully compensate.
This guide uses gram per watt (g/W) as your diagnostic framework. It is a practical metric for measuring whether your inputs are translating into output — and for pinpointing where you may be losing yield. These strategies apply at any scale, from a home grow tent to a multi-room commercial facility. We will cover the fundamentals first, then provide commercial-scale guidance for larger operations.
How to Use This Guide
Before diving into the fixes, follow this three-step process:
- Measure your current g/W. Divide your total dry harvest weight in grams by the total wattage of your lighting. If you have not tracked this before, use the HydroBuilder Yield Calculator to establish your baseline from your last run.
- Identify your weak pillar. Light, nutrition, environment, irrigation, or root-zone management — most operations have one area where performance lags the rest. The diagnostic sections below will help you find it.
- Choose one or two changes per cycle. Implement them, re-measure, and build from there. Stacking every change at once makes it difficult to know what actually moved the number.
What Is Gram Per Watt — and Why It Still Matters in the LED Era
Gram per watt is a straightforward yield-efficiency metric: total grams harvested divided by total watts consumed by your lighting. It tells you how effectively your operation is converting electrical energy into saleable flower.
In the HPS era, 0.5–1.0 g/W was a commonly cited commercial benchmark. Modern high-efficiency LEDs have raised that ceiling in many rooms. Today, dialed-in operations running quality LEDs in coco or rockwool with precision fertigation can often achieve roughly 1.2–1.5 g/W, assuming solid genetics and strong environmental control. The upper tier — facilities running CO₂ enrichment with tight environmental and irrigation control — can sometimes push into the 1.5–2.0 g/W range in highly optimized rooms, though this should be treated as an aspirational ceiling rather than a typical expectation.
The metric remains useful in the LED era, though it is worth calibrating expectations. Some growers prefer grams per µmol of usable light output, which accounts for fixture-efficiency differences more precisely. However, g/W is still one of the most practical benchmarks for day-to-day operational tracking because watts consumed is always a known number regardless of fixture type.
Benchmark Table by Light Technology
| Light Type | Entry Range | Strong Performance | Elite Operations |
|---|---|---|---|
| HPS (1000W DE) | 0.5–0.7 g/W | 0.8–1.0 g/W | 1.0–1.2 g/W |
| CMH / LEC | 0.6–0.8 g/W | 0.9–1.1 g/W | 1.1–1.3 g/W |
| High-efficiency LED | 0.8–1.0 g/W | 1.0–1.5 g/W | 1.5–2.0 g/W* |
*Upper range generally achievable only under CO₂ enrichment at roughly 1,200–1,500 ppm with optimized VPD, fertigation, substrate moisture management, and appropriate genetics in well-designed, tightly managed rooms.
The 6 Reasons Your Gram Per Watt Is Low
Reason 1: Your Lighting Technology or Coverage Has a Hard Ceiling
A common reason experienced growers plateau around 0.7–0.8 g/W is that their fixture simply cannot deliver more usable photons to the canopy. Older HPS fixtures or low-efficiency LEDs have a photon-output ceiling that no amount of feeding or training will overcome.
If you are running HPS and your environment and nutrition are already tight, the next meaningful yield gain often comes from upgrading to a high-efficiency LED. Modern full-spectrum fixtures generally deliver more photons per watt to the canopy with better coverage uniformity than legacy technologies. The Growers Choice ROI-FF 650W is rated at about 1,950 µmol/s with an efficacy of roughly 3.0 µmol/J, and is designed to support roughly 1.0–1.5 g/W performance in well-managed rooms when paired with optimized genetics, environment, and fertigation, with actual results depending on mounting height and room design. For growers who need a scalable, high-output option, the Growers Choice ROI-E720 is the commercial-grade step up, rated for about 1,870–2,080 µmol/s output at around 2.6 µmol/J according to manufacturer specifications.
You can also use the Grow Light Coverage Calculator to confirm whether your current fixture is covering your footprint adequately before committing to an upgrade. Not sure whether LED makes sense for your facility? The LED vs HPS guide breaks down the broader economics across different operation sizes.

Reason 2: Your Lower Canopy Is Doing Nothing
In a typical indoor room, the top 12–18 inches of canopy capture the vast majority of light. Everything below tends to run at a fraction of optimal PPFD — producing airy, lower-density buds that drag your overall g/W average down.
Under-canopy lighting addresses this directly. Horizontal LED bar fixtures positioned mid-canopy deliver supplemental light to secondary bud sites that your overhead fixture cannot reach consistently. Commercial growers using Netafim drip systems often combine under-canopy lighting upgrades with irrigation improvements in the same cycle because both address the same root issue: the bottom of your plant is not getting what it needs.
The Faven Lighting Chroma with Far Red 46″ Under-Canopy LED Bar is purpose-built for this application, providing a tailored spectrum with both primary light and controllable far-red channels. Far-red wavelengths can enhance photosynthetic efficiency when combined with primary red wavelengths — a response well-documented in photosynthesis research — which supports improved canopy performance in mid- and lower-canopy tissue when used correctly as part of a broader lighting strategy. Some commercial operators report meaningful improvements in secondary-site density and overall yield when combining under-canopy lighting with precise irrigation, though actual gains vary by room design, irrigation strategy, and cultivar. The Faven Adjustable Stands allow precise height positioning as the canopy develops.
Reason 3: Your Nutrient Program Isn't Consistent Enough to Measure
An inconsistent nutrient program makes it almost impossible to draw clear conclusions from g/W data. If you are changing products, dosages, or recipes every cycle, gram-per-watt trends will reflect noise instead of your system’s true potential.
The solution is not necessarily more products — it is a more consistent foundation. HGV Nutrients is a three-part nutrition system with decades of commercial development behind it. The system is built around a simple two-part-at-a-time structure: Base runs throughout both stages as the constant, supplying calcium and nitrogen to support cell-wall integrity and metabolic efficiency at every phase. In vegetative growth, Base pairs with Grow to drive canopy development and root architecture. At the transition to flower, Grow gives way to Flower — which delivers the phosphorus, potassium, and sulfur profile aimed at supporting floral development and secondary metabolite production, including terpene synthesis.
For most grows, that is the core of the program. HGV’s high-purity formulas are designed to be complete when used as directed, which is why many operations using HGV report lower nutrient overhead and more predictable run-to-run performance compared with more additive-heavy programs, although outcomes always depend on implementation and overall system design.
Both dry and liquid formats are available. HGV Dry is a cost-efficient choice for large-scale operations mixing concentrate — stable, with a long shelf life, and well-suited to Dosatron-based fertigation systems. The HGV Liquid Essentials Kit delivers similar performance in a ready-to-pour format for operations that prefer convenience and precision without batch mixing. Both are available at Hydrobuilder.com.
For a deeper look at feeding frequency and scheduling, see how often to feed your plants nutrients.


Reason 4: Your Environment Is Out of Specification
Cannabis yield is tightly linked to VPD — the vapor pressure deficit that governs how hard the plant’s transpiration system is working. When temperature and humidity fall outside an appropriate range for each growth stage, the plant typically slows photosynthesis, reduces stomatal conductance, and produces less biomass and flower.
Target ranges that often maximize photosynthetic efficiency under strong LED lighting in many commercial rooms include:
- Late veg: 75–80°F, 60–70% RH (approximately 0.8–1.0 kPa VPD)
- Early flower: 75–80°F, 55–65% RH (roughly 1.0–1.2 kPa VPD)
- Mid to late flower: 72–78°F, 45–55% RH (about 1.2–1.6 kPa VPD, with many growers tapering toward around 1.0–1.3 kPa late)
These VPD ranges are typical working targets for many LED-driven commercial rooms, and you should adjust them based on cultivar, CO₂ levels, and facility design.
You cannot manage what you do not measure. A reliable thermo-hygrometer with Min/Max memory — like the Active Air Indoor-Outdoor Thermometer w/Hygrometer — tells you what your room actually did between checks, not just what it is doing when you are standing in it. Tracking environmental swings between lights-on and lights-off is critical because this is where many growers lose VPD compliance without realizing it.
Reason 5: Canopy Training Isn't Maximizing Your Footprint
Light is distributed across your canopy footprint. The more evenly you spread that canopy, the more efficiently your lighting converts into yield per watt. Tall, columnar plants with a single dominant cola create extreme light gradients — the top cola gets very high PPFD, and everything below gets significantly less.
The techniques that consistently help increase g/W through training include:
- Topping and FIMming — promotes multiple dominant colas from a single plant, increasing the number of high-PPFD bud sites.
- Low-stress training (LST) — spreads branches horizontally to fill the canopy footprint without causing significant recovery time.
- ScrOG — maximizes coverage uniformity across the entire light footprint and is most effective when combined with precise irrigation so each plant in the screen receives consistent feeding.
- Defoliation in early flower — selectively removes fan leaves that block light to bud sites below; commercial operations using structured defoliation commonly report density improvements in secondary sites when other parameters are dialed in.
Reason 6: Genetics Have a Hard Ceiling
This is the reason many growers do not want to hear, but it is often a significant constraint. A cultivar that effectively tops out near 0.7 g/W under your specific conditions will tend to do so regardless of how tight your environment and nutrition are once those are reasonably optimized.
If you have been running the same cultivar for multiple cycles and your g/W number has plateaued despite improvements to light, nutrition, and environment, it is worth testing a new cultivar alongside your current one. When evaluating cultivars for LED-driven fertigation rooms specifically, look for dense internode spacing, a proven track record with high-PPFD environments, and phenotype stability across runs. Stability matters as much as peak potential — a cultivar that performs consistently at about 1.1 g/W every run is often more valuable operationally than one that hits 1.4 g/W once and delivers 0.8 g/W the next. Rotating in cultivars known for strong yield potential in your chosen system can reveal whether genetics are the remaining bottleneck.
Dial In Irrigation, Fertigation, and Crop Steering
This is the pillar most growers overlook — and it is where the difference between roughly 0.9 g/W and 1.3 g/W often lives. Lighting and nutrients get most of the attention, while irrigation and root-zone management frequently separate consistent high performers from operations that only occasionally have great runs.
Why Hand-Watering Caps Your Yield
Hand-watering introduces inconsistency that is almost impossible to eliminate at scale. The volume applied usually varies slightly from plant to plant and day to day. Dry-back periods are inconsistent, and EC can swing between feedings as plants sit dry for varying durations. None of these variables may feel significant on their own, but they compound over an eight-to-ten-week flower cycle into measurable yield losses.
Precision drip irrigation helps solve this by delivering the same volume, at a consistent flow rate, to every plant in your room on a set schedule. Netafim’s pressure-compensating drip-emitter systems are a widely used commercial standard for this reason — each emitter is designed to deliver a calibrated, consistent flow across a specified pressure range regardless of its position on the mainline. When designed correctly, every plant gets the same feed, every event.
Fertigation: Feeding That Matches Transpiration
Fertigation — delivering nutrients through your irrigation system — changes the feeding model from “big floods” to “small, frequent doses.” Instead of saturating the root zone with a large feed and waiting for it to dry, a fertigation-based system delivers small, precisely dosed shots of nutrient solution timed to approximate the plant’s transpiration rate throughout the lights-on cycle.
The practical result: EC tends to stay more stable, pH drift is minimized, and the root zone avoids the wide swings between over-saturation and drought stress that hand-watering often creates. Monitoring runoff pH alongside EC is worth building into your standard practice, because even a well-designed fertigation system will not deliver full nutrient availability if root-zone pH drifts outside the roughly 5.5–6.2 range that most inert substrates require. A Dosatron proportional injector system is a widely used commercial upgrade for operations making this transition. Dosatron units inject nutrient concentrate directly into the water line at a fixed ratio — no batch mixing, no electrical hookup required, and consistent dilution every event when correctly maintained. Operations that move from hand-watering to properly designed fertigation frequently report not just yield improvements but lower labor costs and more predictable run-to-run performance, although specific results vary by facility and system design.
Significant changes to fertigation frequency, EC, and shot size should always be phased in gradually and, when possible, tested on a limited number of zones before being adopted facility-wide to avoid unintended plant stress at commercial scale.
Crop Steering: Using the Root Zone to Drive Yield
Crop steering is the practice of influencing plant growth direction — vegetative (leafy, structural growth) versus generative (flower production, resin density) — by manipulating the substrate environment. It is one of the ways top commercial operations push g/W numbers into the 1.3–1.5+ range once lighting and nutrition are already dialed.
The primary steering levers are substrate water content and dry-back:
- Vegetative steering: Shorter dry-backs, lower EC, and more frequent irrigation events keep the root zone relatively wetter. The plant responds by prioritizing vegetative structure — branching, canopy development, and root expansion. This is typically preferred through veg and roughly the first week or two of flower.
- Generative steering: Longer dry-backs between irrigation events and slightly elevated EC in early-to-mid flower create a mild, controlled stress between events. The plant responds by investing more energy into flower production and resin density rather than continued vegetative growth. When balanced properly, denser, heavier buds are often the result.
A simple starter steering pattern for coco or rockwool might look like:
- Veg through early flower (weeks 1–3): Short dry-backs of roughly 10–15%, with irrigation to near field capacity multiple times per day. Prioritize vegetative structure and root development.
- Mid flower (weeks 4–6): Allow dry-backs of about 25–35% before the first irrigation event of the day. Run slightly elevated EC on inflow to drive a generative response.
- Late flower (weeks 7–harvest): Gradually return toward shorter dry-backs and somewhat lower EC. Ease off generative pressure as the plant finishes to avoid excessive stress.
These dry-back and EC ranges are example starting points and should be tuned based on substrate type, block or pot size, cultivar, and the specific irrigation hardware you are using.
Choosing the Right Substrate for Steering
Crop steering works best in substrates with predictable, measurable water-holding characteristics. Rockwool and properly buffered coco coir are particularly well-suited because their water-retention and dry-back behaviors can be characterized and repeated across runs.
VidaWool rockwool is a commercial-grade option designed for consistency, using Hydro‑Xtend water dispersion technology to promote even water and nutrient distribution and more predictable water retention from block to block when used correctly. Coco coir can perform similarly well when properly buffered and managed. Both give growers a reliable baseline that steering protocols require, whereas complex living-soil systems are typically harder to steer in a precise, data-driven way because water and nutrient dynamics are less uniform and more biologically variable.
Monitoring the Root Zone
At or below about 0.9 g/W, basic monitoring — visual checks, occasional runoff EC and pH readings — may be enough to guide improvements. As you push toward 1.2 g/W and above, guessing is usually not sufficient. Operations running tight steering protocols track substrate water content, inflow EC, runoff EC (to calculate uptake efficiency), runoff pH, and runoff percentage as standard practice.
The AROYA SOLUS 3-in-1 wireless sensor monitors EC, temperature, and substrate moisture content simultaneously, with data read via a mobile app. While it does not log data continuously, using it consistently at set times provides the snapshots needed to refine steering decisions. For rooms running Netafim and Dosatron systems, the TrolMaster Aqua-X irrigation-control platform can tie irrigation-event timing and volume to sensor feedback and schedules, allowing irrigation to be based on actual substrate conditions rather than a fixed timer alone.
The Role of CO₂ in Increasing Yield
CO₂ enrichment is a genuine yield lever — but it belongs at the end of this list deliberately. Adding CO₂ to a room with suboptimal light, inconsistent nutrition, or poor irrigation will typically produce limited gains. CO₂ only amplifies photosynthesis when the plant already has everything else it needs to run near full capacity.
In a well-dialed room — strong LED lighting, tight VPD, precision fertigation, and consistent root-zone management — CO₂ enrichment in the roughly 1,200–1,500 ppm range can, in some well-optimized operations, increase yield by around 15–30% under those specific conditions (elevated temperatures of roughly 80–85°F, high light intensity, and good air mixing). Below appropriate light and temperature thresholds, the plant will not fully use the additional CO₂. Above about 1,500 ppm, yield gains tend to plateau and may diminish, while safety and compliance concerns increase, and local regulations or worker-safety standards may impose lower limits.
CO₂ is also the upgrade that requires the most infrastructure commitment. You need sealed or near-sealed rooms, independent temperature and humidity control capable of handling the additional heat load, and reliable monitoring. The Autopilot CO₂ Monitor & Controller line provides digital control and monitoring functions for operations managing CO₂ at scale. For tent growers or operations adding a dedicated CO₂ source to an existing room, the Covert CO₂ Regulator is a practical entry point for connecting a CO₂ tank to your grow space.
Any CO₂ system in a commercial facility should include appropriately installed monitoring, alarms, emergency-ventilation provisions, and staff training to comply with local codes and worker-safety guidelines.
Commercial Workflow: Using Gram Per Watt as a Facility KPI
For multi-room commercial operations, g/W stops being just a performance metric and becomes a facility-management tool. Tracking g/W by room — across every harvest cycle — gives facility managers a precise, comparable signal for where resources should go.
Use the HydroBuilder Yield Calculator to log every run by room. Over three to five cycles, patterns emerge: one room consistently outperforms, another plateaus. When you can attribute those differences to specific variables — lighting age, irrigation-zone differences, cultivar variation, or environmental constraints — you can make targeted improvements rather than broad, unfocused changes.
A realistic set of commercial benchmarks worth targeting with a well-equipped facility:
- Baseline expectation (good LED, hand-watered, solid nutrition): about 0.8–1.0 g/W
- Optimized operation (precision drip, fertigation, tight VPD): around 1.0–1.3 g/W
- Elite performance (CO₂, substrate monitoring, full crop steering): approximately 1.3–2.0 g/W under ideal conditions with strong genetics and experienced operators
Many commercial facilities making the transition from hand-watering to properly designed precision drip fertigation report their single largest per-cycle yield improvement from that change alone, with additional gains as they layer in steering and CO₂. For a fuller picture of operating costs alongside these yield gains, the Grow Room Electricity Calculator helps model the ROI of infrastructure upgrades against actual power consumption.
Frequently Asked Questions
Q: What is a good gram per watt for cannabis?
A: A good gram per watt for indoor cannabis depends on your lighting technology and how optimized the rest of your system is. HPS operations typically target around 0.8–1.0 g/W as a strong benchmark. High-efficiency LED rooms with solid nutrition and environmental control should aim for roughly 1.0–1.3 g/W, with some well-dialed facilities reaching higher. Operations running CO₂ enrichment with precision fertigation and tight crop steering can, under optimized conditions (approximately 80–85°F, 1,200–1,500 ppm CO₂, strong light intensity, and good genetics), reach roughly 1.3–2.0 g/W in highly optimized rooms, though this is not a typical baseline expectation.
Q: How do I calculate gram per watt?
A: Divide your total dry harvest weight in grams by the total wattage of your grow lights. For example, a 650-watt fixture producing 780 grams equals 1.2 g/W. For more complex rooms with multiple fixtures and varying wattages, use the HydroBuilder Yield Calculator to total your wattage, compute g/W, and track improvement run over run.
Q: Why are my grams per watt so low?
A: Low g/W typically points to one or more of six root causes: outdated or under-powered lighting, poor lower-canopy light coverage, inconsistent nutrient delivery, environment outside recommended VPD targets, inadequate canopy training, or a genetic ceiling on the cultivar you are running. Among experienced growers, irrigation inconsistency is often the most overlooked factor — hand-watering introduces EC and dry-back variability that well-designed precision drip and fertigation systems greatly reduce.
Q: Does CO₂ increase cannabis yield?
A: Yes, CO₂ enrichment can increase yield, but only when the plant already has strong light, appropriate temperatures, VPD in range, and consistent fertigation. CO₂ levels in the approximately 1,200–1,500 ppm range can, in some well-optimized rooms, increase yield by about 15–30% under those specific conditions (approximately 80–85°F, high PPFD, strong air movement, and tuned irrigation and nutrition). In rooms with suboptimal lighting or environmental control, added CO₂ often produces minimal gains because the plant cannot effectively use it, and any enrichment must comply with local safety regulations and monitoring requirements.
Q: What is crop steering in cannabis cultivation?
A: Crop steering is the practice of influencing whether the plant prioritizes vegetative growth or generative growth by deliberately adjusting substrate water content, dry-back, and EC. Shorter dry-backs and lower EC generally promote vegetative growth; longer dry-backs and moderately elevated EC in early-to-mid flower encourage a generative response — denser buds and higher resin density. Effective steering requires a substrate with predictable water-holding behavior (such as rockwool or properly buffered coco) and precise drip irrigation to control the timing and size of irrigation events, and should be implemented gradually to avoid excessive stress.
Q: What’s the difference between irrigation and fertigation?
A: Irrigation simply delivers water. Fertigation delivers water and dissolved nutrients simultaneously through the same system. Fertigation allows small, frequent doses timed closer to the plant’s transpiration rate — keeping EC more stable and avoiding the boom-and-bust feeding cycle common with batch mixing and hand-watering. For commercial operations, proportional injectors like Dosatron units are a widely used fertigation solution, injecting nutrient concentrate into the water line at a calibrated ratio without requiring electrical power when plumbed correctly.
Q: How often should I water cannabis in coco or rockwool?
A: Frequency depends on your growth stage, substrate, and steering strategy. In vegetative growth, watering to near field capacity multiple times per day keeps the substrate relatively wet and promotes vegetative development. In mid flower, allowing dry-backs of roughly 25–35% between the last irrigation of the previous day and the first irrigation of the current day helps drive a generative response in coco or rockwool. The key is consistency — the timing, volume, and EC of each event matter more than following a rigid daily schedule, and adjustments should be made gradually while monitoring plant response.
Q: How do I track gram per watt improvement over time?
A: Log every run by room, noting total wattage, harvest date, and total dry weight in grams. Calculate g/W after each harvest. Over three to five cycles, you will see whether changes you implemented — new lighting, fertigation upgrades, steering-protocol changes — are moving the number and by how much. The HydroBuilder Yield Calculator is built specifically for this kind of run-to-run benchmarking.
Q: Can I increase yield without upgrading my lights?
A: Yes — often significantly. Moving from hand-watering to precision drip fertigation, dialing VPD to stage-appropriate targets, and implementing basic crop steering can move a well-lit room from roughly 0.8 to around 1.1+ g/W without changing the fixture. Under-canopy lighting can also be a high-ROI upgrade because it improves lower-canopy performance without replacing your existing overhead infrastructure, provided it is integrated thoughtfully into your overall lighting and irrigation strategy.
Q: What substrate is best for crop steering cannabis?
A: Rockwool and buffered coco coir are two of the most effective substrates for crop steering because both offer relatively predictable, measurable water-holding characteristics when sourced and managed correctly. VidaWool rockwool blocks are designed for even water and nutrient dispersion using Hydro‑Xtend water dispersion technology and more predictable water retention from block to block — an important foundation for steering protocols that rely on repeatable dry-back profiles. Soil and living-soil systems are generally more difficult to steer precisely because water and nutrient dynamics are less uniform and harder to monitor in real time.