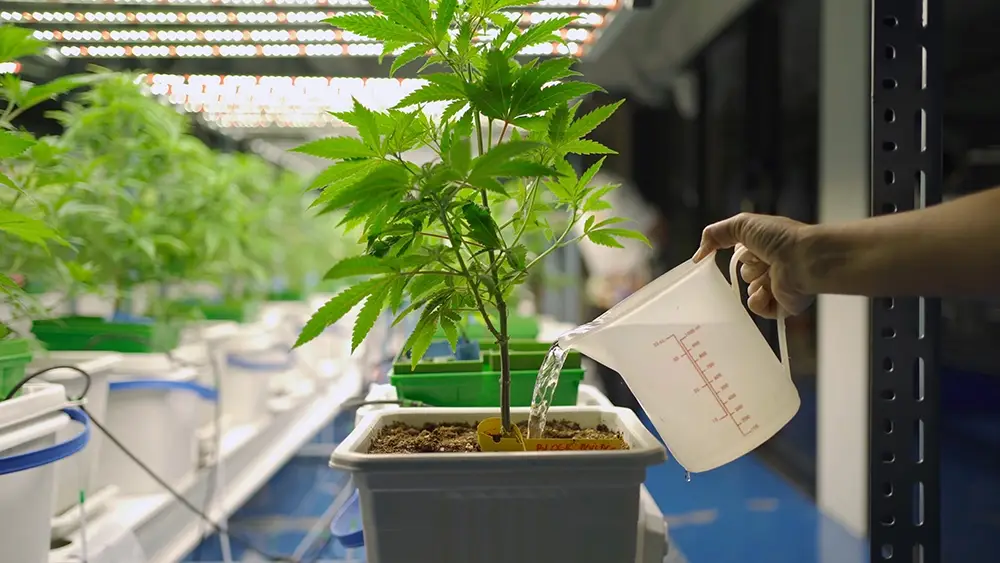
Most nutrient mistakes don’t announce themselves. They compound quietly — a slightly unchecked pH here, an unnecessary additive there, a fertigation injector no one has calibrated in six months — and by harvest, yield is off and no single cause is obvious. These are the five nutrient inefficiencies that cost growers real output, at every scale from a single tent to a multi-room commercial facility.
These strategies apply at any scale — from a home grow tent to a multi-room commercial facility. We’ll cover the fundamentals first, then provide commercial-scale guidance for larger operations.
Why Nutrient Efficiency Problems Are Often Invisible Until It’s Too Late
Most yield-robbing nutrient problems are not acute emergencies — they are slow leaks.
A cannabis plant showing nitrogen deficiency symptoms has typically been running suboptimal nitrogen availability for days before those symptoms appear. A grower who reacts only to visible leaf symptoms is always behind. A grower who monitors EC, pH, and system function proactively catches problems when they’re still correctable. The five mistakes below aren’t rookie errors. They show up in experienced operations regularly, because they hide in systems and habits rather than in obviously sick plants.
Mistake #1: Running Unnecessary Additives Without Understanding Interactions
Stacking additives without understanding how they interact is one of the most common ways growers silently suppress their own results.
The issue isn’t that additives are bad — it’s that nutrients compete and interact. Calcium in excess is well documented to antagonize magnesium and potassium availability, and can also reduce the uptake of several other nutrients if levels are pushed too high relative to the rest of the program. Excess phosphorus commonly antagonizes zinc and iron, and in some cases copper, leading to hidden micronutrient deficiencies even when total ppm looks adequate. When you add a bloom booster on top of a base program already delivering adequate P and K, you’re not automatically enhancing bloom development — you may be increasing the risk of micronutrient lockout while adding avoidable EC load and biofilm risk to your fertigation lines.
This is the core logic behind Mulder’s Chart of Nutrient Interactions: it illustrates potential antagonistic and synergistic relationships between elements, and shows that changing one nutrient’s level can influence the availability of others depending on concentration and context. For a review of how these interactions map out, see our guide on NPK ratio and nutrient balance.
The fix: Start by auditing your feed program against your base nutrient’s own stated NPK and micronutrient profile. If your base is already supplying adequate levels of a nutrient for your crop and system, any additive that supplements that same element is more likely to increase antagonism risk and organic load than to provide additional benefit.
This is part of why purpose-built, research-backed nutrient systems perform so consistently at scale.
HGV Dry nutrients — developed over 30+ years of commercial cultivation — are engineered as a complete two-part system: one formula for each growth phase, paired with a stable base. The system is designed to be fed at a consistent EC from start to finish within each stage, eliminating much of the guesswork and interaction risk that comes with stacking multiple supplemental products on top of each other.


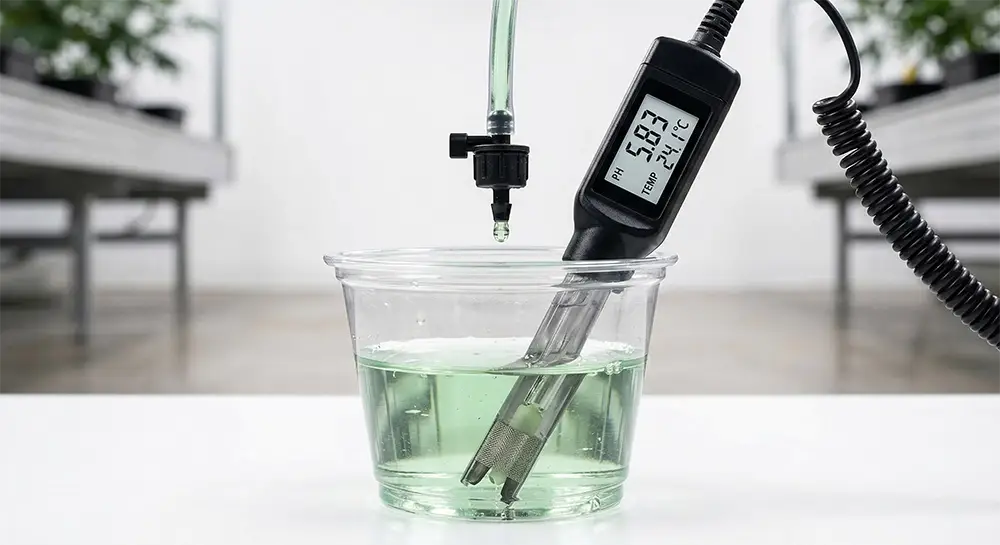
Mistake #2: pH Drift You’re Not Catching — Because You’re Measuring in the Wrong Place
pH management is the most-discussed topic in growing — and still one of the most frequently mismanaged, because many growers are measuring in the wrong location and drawing false confidence from those readings.
The single most important thing to understand: where you measure pH matters as much as what you measure. Fertigation panels that display pH immediately at the exit point of the dosing manifold often give misleading readings because the pH adjuster has not had time to fully mix or finish reacting with the solution. Readings taken directly from a reservoir or dosing output can shift by 0.3–0.8 pH units over the next five minutes as mixing completes, especially in larger batch tanks or high-throughput systems.
Accurate pH measurement means waiting 5–15 minutes after adding a pH adjuster to a batch tank — or capturing solution directly at the dripper at the plant site. It also means calibrating your meter regularly. A probe that hasn’t been calibrated in 30 days can realistically read 0.3–0.5 units off from actual, depending on use and storage, which is enough to push plants outside optimal nutrient availability ranges without obvious deficiency symptoms yet.
For the full mixing order and timing protocol, including why pH adjustment goes last, see our complete guide on mixing plant nutrients.
For precise, reliable pH adjustment at any scale, HGV Condition – pH Down and HGV Condition – pH Up are formulated for direct use with the HGV nutrient system and noted for clean, predictable reactivity when used as directed. HGV Condition – pH Up is a concentrated 17% potassium hydroxide solution that should be diluted prior to use to minimize the risk of localized high-pH zones or nutrient precipitation, and it must always be added only after all nutrients are fully dissolved and mixed, in line with manufacturer guidance.


Mistake #3: Not Fully Mixing Before Adding the Next Component
Adding nutrients before fully dissolving the previous component causes precipitation — nutrient particles fall out of solution and become unavailable to roots.
This is especially critical for calcium-containing nutrients and silica supplements. Silica added to a solution containing calcium before either has been given time to fully dissolve and dilute can precipitate into insoluble compounds that form visible haze or scale. Once precipitated, those nutrients are functionally gone — they contribute to EC readings without delivering actual plant-available nutrition, which makes your EC meter a less accurate tool and increases line-fouling risk.
For the complete mixing sequence and timing, our dedicated mixing plant nutrients guide covers each component and the correct intervals between additions.
Mistake #4: Chasing Leaf Symptoms Instead of Diagnosing the System
A yellow leaf is not a diagnosis — it’s a symptom report. The most costly version of this mistake is when growers add nutrients in response to visual symptoms without first ruling out pH lockout, EC imbalance, or root zone issues.
Adding iron because leaves show interveinal chlorosis, when the root cause is elevated substrate pH (above roughly 6.5 in hydro and coco systems), doesn’t fix the problem. It adds iron load to a solution where iron can’t be absorbed efficiently at that pH anyway, raises EC, and pushes the Mulder’s Chart antagonism cascade further out of balance. The iron you added is now also competing with manganese, zinc, and copper, which may exacerbate other micronutrient issues.
The correct diagnostic sequence for any suspected deficiency is: check pH first → check EC and confirm it matches your target feed concentration → look at root zone health and water temperature → then examine which specific element is deficient and why.
Visual symptom matching is useful, but it has a hard ceiling. At commercial scale, the most reliable way to move beyond guesswork is lab-based plant tissue and nutrient solution testing. Hydrobuilder offers Grow Diagnostics & Plant Health Testing through Arvum, a leading plant science partner. Plant Tissue Analysis, Nutrient Water Analysis, and Run-Off Testing each generate precise data on what’s actually available at the root zone — rather than what your formula says should be there. After results come back, a Cultivation Advisor walks through the findings and translates them into specific program adjustments. For a deeper look at how tissue and media testing work in practice, see our guide to grow diagnostics for cannabis.
For a systematic approach to identifying and correcting deficiencies by symptom type, our diagnosing nutrient deficiencies guide walks through the full identification process.
Mistake #5: A Fertigation System That Isn’t Calibrated to Deliver What You Think It Is
This mistake is almost exclusively a commercial-scale problem — and it may be the most yield-relevant of all five.
Dosatron injectors, peristaltic pumps, and automated dosing controllers are precision tools, but they require maintenance and calibration to remain precise. Injector ratios drift over time. Tubing in peristaltic pumps wears and delivers less volume per revolution than it did six months ago. pH probes in inline controllers accumulate mineral deposits that cause reading drift. A system that was dialed in at startup can be delivering 15–20% less than target EC to the canopy months later — and growers, seeing apparently stable plant responses, may never catch it without targeted validation.
Validation is straightforward when done systematically. At the end of the fertigation line — at the dripper — collect solution, measure EC, and compare it to your target. Confirm your injector ratios deliver the expected output by running a catch test: run the injector for a set time into a calibrated container and verify volume. Recalibrate inline pH probes monthly, or more frequently under heavy use. If your system’s automation controller logs pH and EC data, trend those logs across weeks rather than reading them only in real time — drift reveals itself over time, not in snapshots.
Growers who suspect their system has drifted — or who are seeing “We’ve been tweaking the fertigation recipe, but it’s still not dialed” or “The EC of our runoff is way higher than what we’re feeding” — are ideal candidates for a Nutrient Water Analysis or Run-Off Test through Hydrobuilder’s Grow Diagnostics service. These tests confirm whether your solution is mixing correctly and whether salts are accumulating beyond what your feed EC suggests.
Commercial Workflow: A Nutrient Efficiency Audit Framework
For commercial cultivators running multiple rooms or automated fertigation, treating these five mistakes as a single interconnected audit is more useful than addressing them individually. Run this framework at the start of each new cultivar cycle and whenever yield or uniformity drops without a clear environmental cause.
Step 1 — Feed Program Audit: List every product in your current program. For each additive beyond your base nutrient system, document: what nutrient element it supplies, whether that element is already present in your base at adequate levels for your crop and system, and whether it introduces organic load or biofilm risk to irrigation lines. Cut any product that fails this review. If you need science-backed confirmation of what your program is actually delivering — rather than what it should be delivering on paper — a Plant Tissue Analysis or Nutrient Water Analysis through Hydrobuilder’s Arvum-powered testing service provides that baseline before you make any program changes.
Step 2 — pH Accuracy Validation: Calibrate all pH meters and inline probes against fresh buffer solution. Collect solution at three points: the batch tank after full mixing, an inline sampling port, and at the dripper. Compare readings. Variation greater than about 0.2 pH units across these points indicates either a calibration problem or a mixing/reaction timing problem that needs correction.
Step 3 — EC Delivery Verification: Confirm injector ratios by catch test. Confirm that EC at the dripper matches target solution EC within roughly 5% under steady-state operation, and document the baseline for future comparison.
Step 4 — System Diagnostic Log: Set a 30-day recalibration schedule for all inline probes as a minimum, tightening intervals during peak production if necessary. Log EC and pH at the dripper weekly and chart trends. Any consistent directional drift of more than 0.2 EC units or 0.3 pH units over four weeks requires a full injector and probe inspection.
Step 5 — Deficiency Response Protocol: Establish a written protocol that prohibits adding supplemental nutrients in response to visual symptoms until pH and EC have been verified at the plant site. All “diagnose the system first” steps must be documented in the grow log before any corrective action is taken.
This audit framework turns the five individual mistakes into a managed, recurring practice rather than a reactive problem-solving loop.
Stop Reacting, Start Auditing
Yield lost to nutrient inefficiency is rarely lost all at once. It bleeds out over a cycle, hidden in compounding small errors that individually seem inconsequential. Running a proactive nutrient audit framework — feed program simplicity, pH accuracy at the plant site, verified EC delivery, and system-first deficiency diagnostics — is the difference between a reactive grower and a profitable one.
For commercial operations looking for additional facility-level cultivation support, Elevated is a commercial ag-tech and advisory resource from HydroBuilder’s sister company.
For additional foundational context, visit our Hydroponics 101 complete guide and our complete breakdown of how often to give plants nutrients
Frequently Asked Questions
Q: What causes nutrient lockout in cannabis?
Nutrient lockout occurs when plants cannot absorb available nutrients, most commonly because pH is outside the optimal absorption range (roughly 5.5–6.5 for hydro/coco and 6.0–7.0 for soil, depending on cultivar and system). It can also result from an excess of one nutrient antagonizing another via Mulder’s Chart interactions, particularly when phosphorus, calcium, or potassium are significantly out of balance with the rest of the profile. Confirm pH and EC at the plant site before treating any suspected lockout with additional product. At commercial scale, verify that your fertigation system is actually delivering target EC to the canopy — not just that the injector is running according to its setpoint.
Q: Why are my cannabis plants showing deficiencies even though I’m feeding the correct nutrients?
The most common cause is that nutrients are present in the solution but unavailable to the plant due to pH drift outside the optimal range for that substrate. A second common cause is that precipitation during mixing has removed nutrients from plant-available form — they still show up in EC readings but cannot be absorbed. Check pH at the dripper rather than only at the reservoir, and confirm your mixing order puts silica or other high-pH additives first (into fresh water) and pH adjustment last, after all nutrients are fully dissolved.
Q: How do I fix nutrient deficiencies in hydroponics?
Always diagnose the system before adding nutrients. Check pH at the plant site, confirm EC matches your target feed concentration, inspect root zone health and water temperature, and review mixing sequence for potential precipitation issues. Only after ruling out lockout, precipitation, and system errors should you consider adjusting the nutrient formula itself. Reactive supplementation without this sequence often worsens the problem by increasing antagonism and EC without resolving the underlying cause.
Q: How do I know if my additive stack is helping or hurting?
Audit each additive against your base nutrient’s existing NPK and micronutrient profile. If the additive supplies an element your base already covers at adequate levels for your crop and system, it is adding antagonism risk and biofilm load without a clear benefit. Purpose-built systems with a minimal, research-validated formula — like the HGV two-part system — are specifically designed to eliminate this problem by delivering a complete profile without heavy additive dependency.
Q: What is the right way to measure pH in a fertigation system?
Measure pH in the batch tank after 5–15 minutes of full mixing, or at the dripper at the plant site by capturing solution in a collection cup. Inline pH sensors at the output of a dosing manifold often give misleading readings because the pH adjuster has not finished reacting and mixing. Always use a recently calibrated meter — probes that haven’t been calibrated in 30+ days can read 0.3–0.5 pH units off from actual under typical grow-room conditions.
Q: How often should I calibrate my fertigation system and pH meters?
Calibrate pH meters and inline probes monthly as a minimum. For commercial operations running continuous fertigation, every two weeks is more appropriate during peak production or when EC and pH stability are critical to meeting yield targets. Verify injector delivery accuracy by catch test at least once per cycle, or any time plant response deviates unexpectedly from historical norms for that cultivar and system.
Q: Can an improperly maintained fertigation system cause yield loss even if my nutrient formula is correct?
Yes — this is one of the most underdiagnosed sources of yield inconsistency in commercial operations. Injector ratios drift with wear, tubing in peristaltic systems degrades, and pH probe mineral buildup causes reading errors. A system delivering around 15% less than target EC over a full flower cycle represents significant yield reduction, and because the loss is gradual, it is rarely attributed to the correct cause. Validate EC at the dripper, not just at the batch tank or controller display.
Q: What EC and pH targets should I be running in hydro vs. coco vs. soil?
Optimal pH ranges for cannabis are generally 5.5–6.5 in hydroponic and coco systems and 6.0–7.0 in soil, with many growers targeting narrower bands within those ranges based on cultivar and substrate. Target EC varies by growth stage and cultivar, but general ranges for cannabis are about 1.4–2.0 mS/cm in veg and 1.8–2.4 mS/cm in flower at the dripper in coco and hydro, assuming healthy plants and adequate drainage. Runoff EC in inert or coco systems typically runs 0.2–0.5 above feed EC in a well-managed program, though the ideal differential depends on substrate, irrigation frequency, and drain volume; significantly higher runoff EC usually indicates salt accumulation requiring a leach or flush. Consult your nutrient line’s feed chart and adjust based on tissue tests, runoff data, and cultivar response.
Q: Should I flush between feeding cycles to prevent salt buildup?
Flushing is most beneficial when runoff EC consistently exceeds feed EC by more than about 0.5 mS/cm, indicating salt accumulation in the root zone. Routine flushing as a scheduled practice is less critical when you’re running a simple, high-purity nutrient formula with minimal organic additive load and appropriate drain volume. For growers running heavy supplemental programs with organics and carbohydrates, scheduled flushes reduce biofilm risk, help prevent salt stratification in the substrate, and can support more consistent EC at the root zone.