A cloning machine gives cuttings exactly what they need to root — oxygen, moisture, and consistency — without constant attention from the grower. Whether you’re duplicating a proven strain in a 4×4 tent or running a continuous propagation cycle across a multi-room facility, the right cloning machine makes a measurable difference in rooting speed, success rate, and how quickly you get plants into canopy.
These strategies apply at any scale — from a single home tent to a commercial facility. We’ll cover how each system type works, how to build your own, which ready-made machines to consider, and what commercial operations need to think about differently.
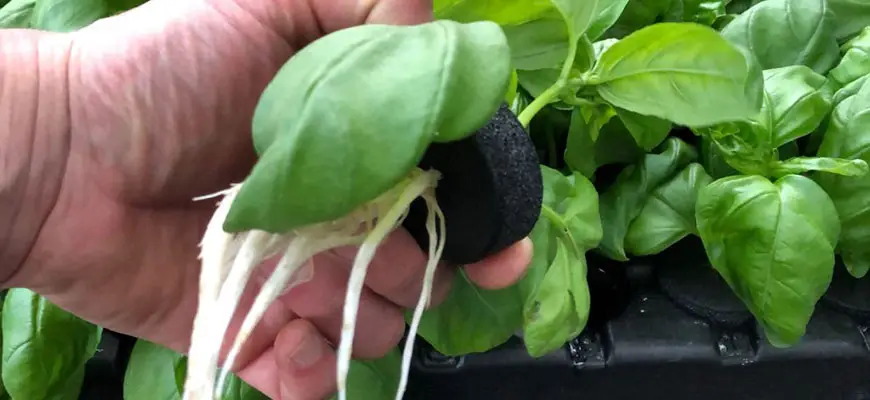
What Is a Cloning Machine?
A cloning machine is a recirculating propagation system that delivers moisture, oxygen, and usually a dilute nutrient solution directly to the exposed stem ends of cuttings. It replaces the passive tray-and-dome setup with an active, automated environment — and that automation is what drives more consistent results when it is set up correctly.
Two system types dominate the market.
Aeroponic cloners suspend cuttings in a manifold lid while a submersible pump drives misters that spray a fine mist upward into the exposed stems. The combination of open-air exposure and regular misting maximizes oxygen contact at the wound site compared to fully submerged stems. Bubble cloners (also called DWC cloners) hold stem ends at or just below the waterline of an aerated reservoir, where an air pump and air stone keep the solution oxygenated. Both systems can work very well when dialed in. They differ primarily in oxygen delivery method, typical rooting speed, and maintenance load.
| Aeroponic Cloner | Bubble Cloner | |
|---|---|---|
| Rooting speed | Often 5–10 days when conditions are well dialed | Commonly 7–14 days, with some cultivars taking longer |
| Success rate | Can approach 99% under optimal conditions with healthy stock | Around 90–95% is common with good practices |
| Maintenance | More frequent — misters can clog | Simpler — fewer moving parts |
| Best for | Higher volume, faster turnaround | DIY builds, budget-conscious growers |
Not every grower needs a cloning machine. If you take only a handful of cuttings once or twice a year, a tray of root plugs under a humidity dome is a practical approach. However, if you pull regular cuts from mother plants or you’re running a perpetual harvest cycle, a cloning machine can pay back quickly in time saved and consistency gained when matched to your facility and process.
How to Build a DIY Cloning Machine
Building your own cloner is a legitimate option for growers who want to customize capacity or reduce upfront cost. The two most common DIY builds mirror the two commercial system types.
DIY Aeroponic Cloner
What you need:
- 2–5 gallon opaque (black) container with a lid
- Low-wattage submersible water pump — oversized pumps add unnecessary heat to the reservoir
- 360-degree spray misters (4–6 per build)
- ½-inch tubing and manifold fittings
- 1¾-inch hole saw for drilling stem sites
- 2-inch foam clone collars
- Pump timer capable of short intervals (for example, 1 min on / 5 min off)
Key build notes: Use a black or fully opaque container to block light and help prevent algae growth in the reservoir. A pump timer is not optional in most low-pressure DIY builds — running the pump continuously tends to warm the reservoir, and warm water significantly increases the risk of stem rot before roots can develop. Aim to keep reservoir temperature between 68–72°F for most crops, as this range balances oxygen availability and pathogen pressure in typical cloning systems. Foam collars stay drier on the surface than many neoprene options and can reduce stem rot risk around the collar interface when sized correctly.
Aeroponic cloners typically root faster and handle higher volume than simple passive methods. However, misters require regular cleaning between cycles to prevent clogging — a clogged mister leaves cuttings dry without any visible warning until they wilt.
DIY Bubble Cloner
What you need:
- 2–5 gallon opaque container with a lid
- Air pump and air stone sized for the container volume
- Airline tubing and a check valve
- 1¾-inch hole saw
- 2-inch foam or neoprene collars
Key build notes: Stem ends should sit just at the waterline — not fully submerged, not dangling well above it. Submerged stems are more prone to rot, while stems with no water contact dry out instead of forming callus. Change the solution every 5–7 days to help prevent stagnation and nutrient imbalances. The air stone should produce a steady curtain of fine bubbles throughout the reservoir, ensuring adequate dissolved oxygen around the stem zone.
Bubble cloners are simpler, cheaper to build, and easier to clean than most aeroponic manifolds. The trade-off is often slightly slower rooting and less tolerance for warm room or water temperatures, since the stems interface directly with the solution.
For a full walkthrough of taking cuttings, dialing in environment, and troubleshooting common cloning problems, see our complete guide to how to clone a plant.
Environmental Parameters for Cloning Success
Environment determines rooting speed and success rate as much as the system itself. Dial in these parameters before your first cut so the cloner is not compensating for a poor room setup.
Temperature: Maintain air temperature at 75–80°F in the cloning zone for most cannabis and similar crops. Keep reservoir temperature between 68–72°F. Reservoir temperatures above about 75°F significantly increase rot risk, particularly in bubble cloners where stems contact the solution directly. In very cool rooms, supplemental heat may be needed to keep both air and solution in range.
Humidity: Target 75–85% RH during the first 7–10 days. Cuttings have no root system yet — they rely heavily on foliar moisture uptake until roots develop. Many aeroponic cloners can be run without a dome in rooms that already maintain adequate humidity because the misting environment maintains stem moisture on its own. Bubble cloners in drier rooms typically benefit from a humidity dome early on to prevent excessive transpiration and wilt.
Light: Provide 18 hours of low-intensity light per day for most vegetative clones. High-intensity lighting causes cuttings to transpire faster than their rootless stems can compensate — keep it gentle and diffuse over the first several days, then ramp up once roots are established.
pH and PPM: Maintain the reservoir at 5.8–6.3 pH in hydroponic and soilless contexts. Run the solution at roughly 200–400 PPM for a light cloning-strength mix if you choose to feed in the cloner. Some growers clone in plain, pH-adjusted water with no added nutrients and achieve excellent results; if you add nutrients, keep concentration light because there are no roots yet to process a full-strength feeding.
Monitoring temperature and humidity consistently is the most reliable way to catch a problem before it kills a cycle. The HBX Thermo-Hygrometer with LCD Display mounts near the canopy and gives you an immediate read on the two variables most likely to derail a propagation run. It’s a commercial-grade environmental monitor designed for grow spaces and is available exclusively at Hydrobuilder.com for these applications.
The Best Cloning Machines at Hydrobuilder
Hydrobuilder carries a focused selection of aeroponic and bubble cloning systems across the full range of operation sizes. The right machine comes down to three things: how many clones you need per cycle, how much maintenance you want to manage, and whether you need to track multiple strains simultaneously.
Psycloner Pro — Best All-Around Aeroponic Cloner
The Psycloner Pro Aeroponic Cloning Machine is available in 35-, 70-, and 140-site configurations — one of the most scalable ranges in the lineup for stepping up production without changing platforms. Its patent-pending spray manifold runs on a smaller pump than many comparable systems, which helps keep reservoir heat lower and can reduce clogging risk when cleaned on a regular schedule. The 70- and 140-site units include caster wheels for moving between propagation stations. Under well-managed conditions, rooting commonly occurs in about 4–10 days, depending on cultivar and environment. A foldable humidity dome is included for operations that want additional early-stage humidity control.
Best for: Growers who want a reliable aeroponic system that scales from a medium home setup through a commercial propagation room without switching brands.
TurboKlone Elite — Best for Commercial Strain Tracking
The TurboKlone Elite comes in 96- and 144-site configurations. TurboKlone’s differentiating feature is a patented built-in cooling fan that actively pushes fresh air into the reservoir and surrounding cooling chambers — a real advantage in warm propagation rooms where pump heat accumulates and drives water temperature up toward rot-prone levels. The Elite Series includes an alphanumeric grid system and color-coded stem collars for tracking multiple strains simultaneously, which is especially useful in commercial nurseries.
Best for: Commercial operations running several cultivars through propagation at once who need reliable strain identification and higher dissolved oxygen delivery in warmer rooms.
EZ-Clone Low Pro — Best for Propagation Shelving
The EZ-Clone Low Pro Cloning System is available in 16-, 32-, 64-, and 128-site configurations. Its low-profile design is purpose-built for shelving systems — a critical feature when a commercial propagation room needs to maximize site count per square foot rather than per unit of floor space. Leak-resistant construction and a viewing port let you monitor root development without opening the system and disturbing humidity around the stems.
Best for: Commercial operations with dedicated propagation shelving, or any grower who needs to maximize clone capacity in a compact footprint.

What to Use With Your Cloning Machine
The cloner handles root-zone conditions inside the unit. These three products handle the rest of the workflow around cut preparation, hormone delivery, and transplanting.
Rooting gel: Clonex Rooting Gel seals the cut end, delivers rooting hormones directly to the wound site, and holds in place throughout the rooting period. Apply immediately before inserting each cutting into its collar — a thorough, even coat is appropriate. It is one of the most consistently used rooting gels at commercial scale because it provides a predictable dose and adheres well to the cutting.
Root plugs for transplanting: When rooted cuttings move out of the cloner, Hydrodynamics International Root Riot Plugs are a reliable bridge medium for the transition into almost any final growing system. Plugs wrap around the stem cleanly, protect the emerging root mass, and transplant without disturbing root development when handled gently.
Propagation tray for lower-volume runs: If you’re running smaller batches alongside a cloner, the HBX 50 Site Seedling Starter Kit with Root Plugs provides a clean, organized propagation setup for starts and backup cuts. It is field-tested for professional operations and available exclusively at Hydrobuilder.com for growers who want a consistent plug-and-tray system.


Setting Up a Commercial Propagation Program?
Commercial operations running perpetual harvest cycles have different requirements than a home grower taking a dozen cuts. Throughput targets, facility layout, strain tracking across multiple cultivars, sanitation protocols between cycles, and staffing all shape which systems make sense, how many units you need, and what you need to keep in stock.
Our team works directly with commercial cultivators to spec propagation setups that match their production schedule. If you’re building out or scaling a propagation room, call us at 888-815-9763. We’ll help you identify the right system for your site count, your room configuration, and your weekly clone requirements before you invest.
Your Next Steps
If you’re ready to start cloning, the complete guide to cloning a plant covers the full technique — mother plant selection, taking and prepping cuts, rooting environment troubleshooting, and transplanting into your grow system.
If you’re choosing between growing from clones versus seed, see Starting From Seed vs. Clones for a side-by-side comparison of both paths. For growers working in a full hydroponic system, our hydroponics 101 guide covers what happens after propagation — from veg through harvest.
Cloning Machine FAQs
How long does it take for clones to root in a cloning machine?
Most aeroponic cloners produce visible root bumps in about 5–7 days and transplant-ready roots in roughly 7–14 days under well-managed conditions — for example, around 70°F reservoir temperature, 78°F air temperature, and about 80% RH. Bubble cloners commonly take 10–14 days, and some cultivars or less-than-ideal environments can push rooting closer to the 3-week mark.
What is the difference between an aeroponic and a bubble cloner?
An aeroponic cloner sprays a fine nutrient or water-based mist upward into suspended stem ends. Stems remain in open air between misting cycles, maximizing oxygen contact while still receiving frequent hydration. A bubble cloner holds stem ends near the surface of an aerated nutrient solution, where bubbles from an air stone keep the solution oxygenated. Aeroponic systems typically root faster and support higher site counts; bubble cloners are simpler to build and maintain, and they have fewer components that can clog.
Do I need a humidity dome with a cloning machine?
It depends on the system and your room conditions. Aeroponic cloners often don’t require a dome in rooms that already run moderate to high humidity, because the misting environment keeps stems adequately hydrated. Bubble cloners in dry rooms (below about 60% RH) benefit from a dome during the first week. In rooms already running 75%+ RH, a dome is rarely necessary with either system type and may even trap excess moisture if not vented.
What should I put in my cloner water?
Start with pH-adjusted water at 5.8–6.3. Many experienced growers clone in plain water at this pH range with no added nutrients and achieve excellent results. If you add a nutrient solution, keep it at roughly 200–400 PPM as a light-strength mix — cuttings have no roots yet to process a heavy feed. A quality rooting gel applied at cut time usually handles hormone delivery; the water’s primary role is hydration and oxygen delivery.
How do I prevent rot in my cloning machine?
Keep reservoir temperature at or below about 72°F, change the solution every 5–7 days, and clean the reservoir and plumbing thoroughly between every cycle. Use a pump timer on aeroponic builds — continuous pump operation heats the water and is a leading cause of warm-reservoir rot. Ensure stem collars hold cuttings firmly without crushing the stem so that tissue is supported but not constricted.
What is the best cloning machine for a home grower?
For small- to medium-scale home grows, the Psycloner Pro 35-site is a practical and reliable aeroponic option that doesn’t require a large footprint. If you prefer a simpler system with fewer moving parts, a DIY bubble cloner built from a 2-gallon bucket and a basic air pump is a proven, low-cost alternative that roots cuttings reliably when environment is dialed in.
What is the best cloning machine for commercial operations?
Commercial growers with high weekly clone requirements should evaluate the TurboKlone Elite (96 or 144 sites) for its active cooling and strain-tracking system, the EZ-Clone Low Pro (up to 128 sites) for shelf-stackable propagation room efficiency, or the Psycloner Pro 140-site for a scalable aeroponic system at a lower entry cost. The right choice depends on your site count target, room layout, and how many cultivars you run simultaneously. Our team is available at 888-815-9763 to help spec the right setup for your facility.
How do I clean a cloning machine between cycles?
Empty the reservoir completely. As one effective example protocol, you can fill the system with water and add hydrogen peroxide at approximately a 30:1 water-to-peroxide ratio, then run the pump long enough for that solution to contact the manifold, misters, and internal plumbing — manufacturers such as TurboKlone recommend a minimum of 8 hours, with a full day preferred. Afterward, drain completely and run with clean, pH-adjusted water for at least several hours before refilling for the next cycle. Flush any clogged misters individually with a fine needle or replace them as needed. Always consult your specific cloner’s manual for exact cleaning products and contact times, because overly strong solutions or improper use can damage plastics and pumps.
Can I build a DIY cloner that performs like a commercial unit?
A well-built DIY aeroponic cloner using quality misters, a properly sized low-wattage pump, foam collars, and a reliable cycle timer can match many commercial units in rooting speed and success rate when operated carefully. The trade-off is build time, the need to stay on top of maintenance and cleaning, and the lack of integrated features like alphanumeric strain grids, fitted domes, or built-in cooling fans. For growers cloning fewer than about 24 sites per cycle, a DIY build is a genuinely practical option.
When should I transplant clones out of the cloning machine?
Transplant when roots reach roughly 1–2 inches and are white and firm — not the moment they first emerge as tiny bumps. Premature transplant stresses the cutting before the root system can support it in a new medium. In aeroponic systems, roots can develop rapidly once they start; check daily after about day 7 so you don’t miss the ideal window where roots are well developed but not yet tangled or overly long.